FAQ
If you could not find an answer to your problem in our FAQ pages, please submit a Tech Support Form
Click here to back to trending articles.
FAQ ID: 32
When using Windows for audio, it may be best to make some optimizations to allow for the best performance of your products. This guide goes both over a step-by-step approach as well as an informative approach to optimizing your system.
- Turning off Windows Sounds
- Windows Power Settings
- Windows Performance Options
- Maintaining your system
- Removing Bloatware from your system
- Disabling & closing any unnecessary background apps
- Disabling any unnecessary background services
- Setting the appropriate Sample Rate & Bit-depth
- Setting the appropriate Audio Buffer Size
- Staying up to date!
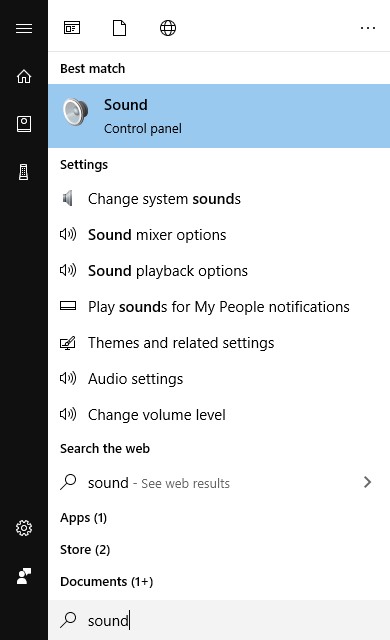
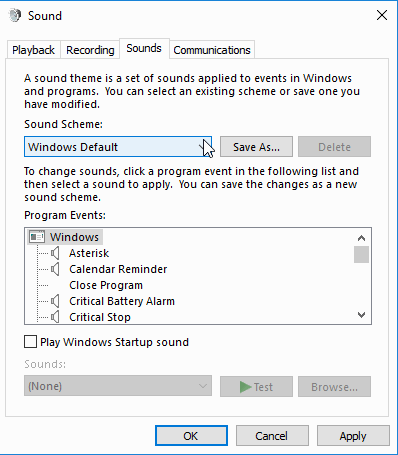
Turning off Windows Sounds
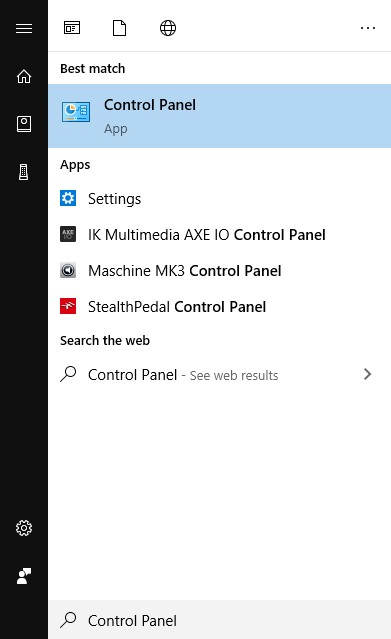
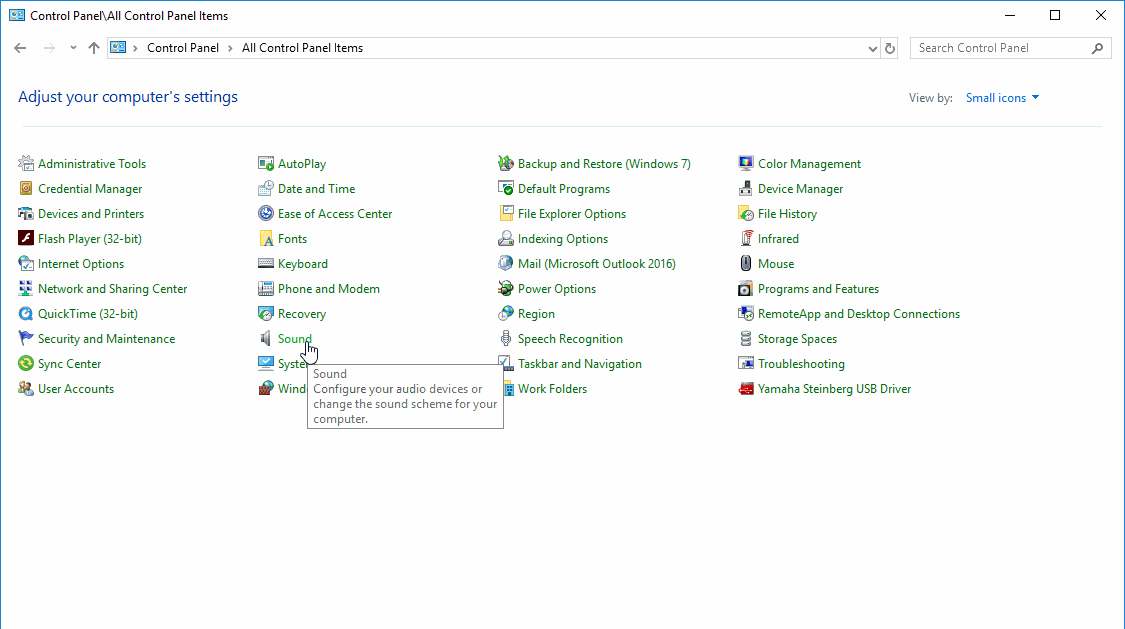
- Click the Windows logo or Start Menu. Type "Sounds" to enter the Control Panel -> Sounds menu. Inside here use the "Sounds" tab to select "No Sounds" as your "Sound Scheme".
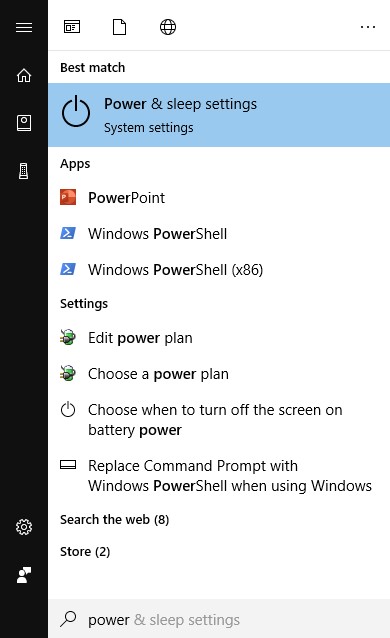
Windows Power Settings
- Click the Windows logo or Start Menu. Type "Power & Sleep Settings". In the newly opened window, select the "Additional Power Settings" option. Inside this window you will be able to select "High Performance" mode. This is preferred for the best performance from your system.
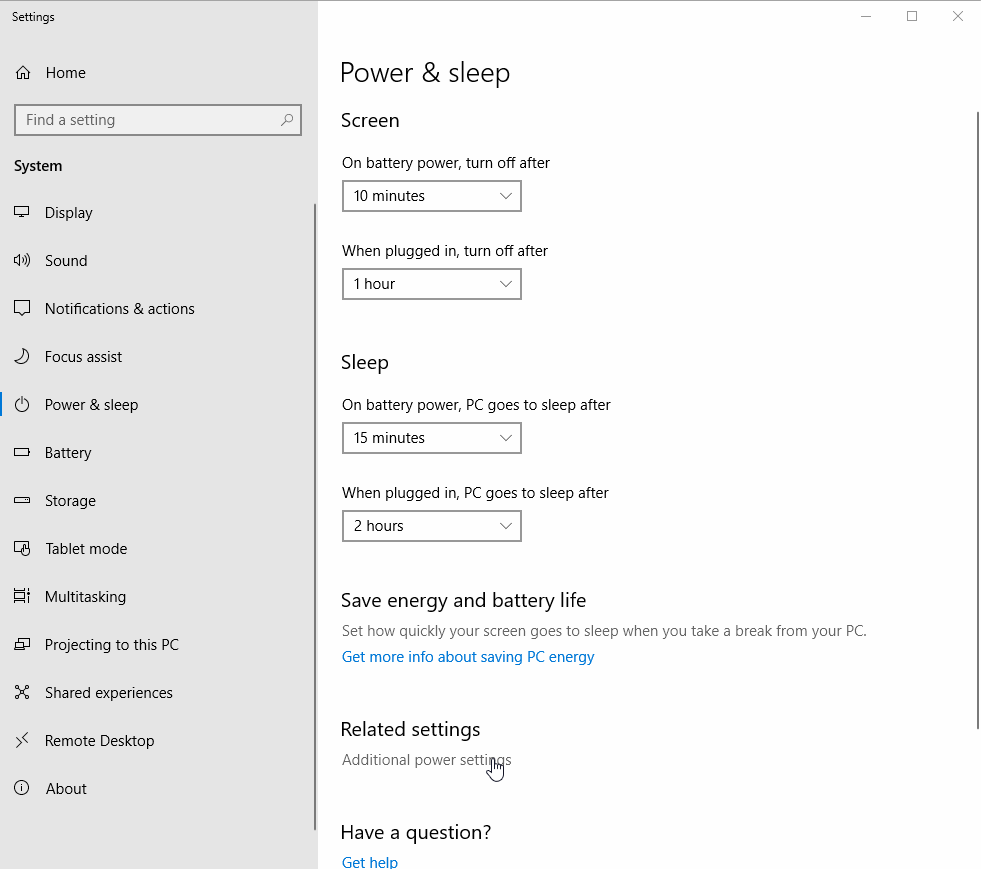
NOTE: The "Additional Power Settings" window will offer an option to "Change Plan Settings". For additional optimizations you can use this window to make sure your USB ports are not turned off for any reason during use which can cause disruptions to your workflow or cause connected peripherals not to operate as they should.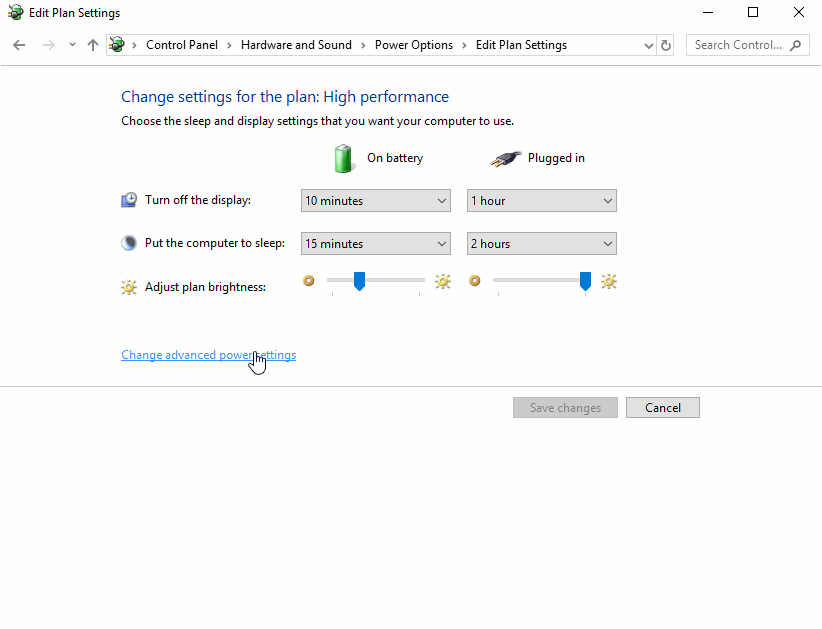
Windows Performance Options
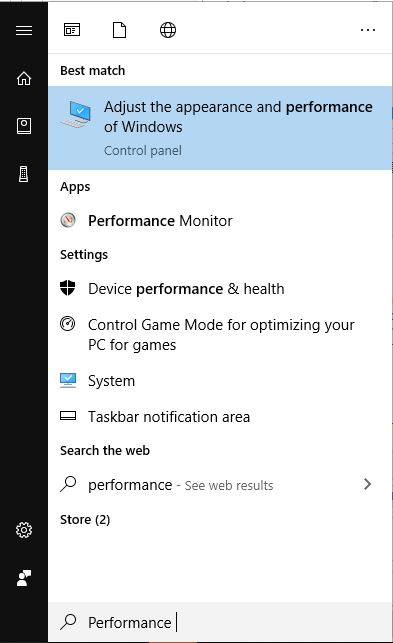
- Click the Windows logo or Start Menu. Type "Performance" and select the "Adjust the appearance and performance of Windows" option. This page will offer the choice to "Adjust for best performance". This is suggested to allow for the most resources to be used for audio, rather than other settings which you may not need at the moment.
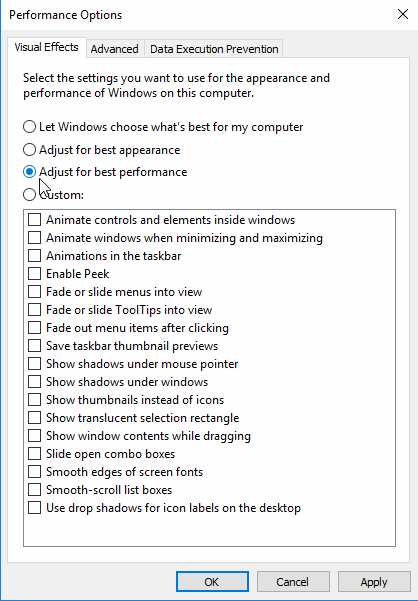
NOTE: In this page you can use a "Custom" option to find a good in-the-middle option for your usage.
Maintaining your system
-
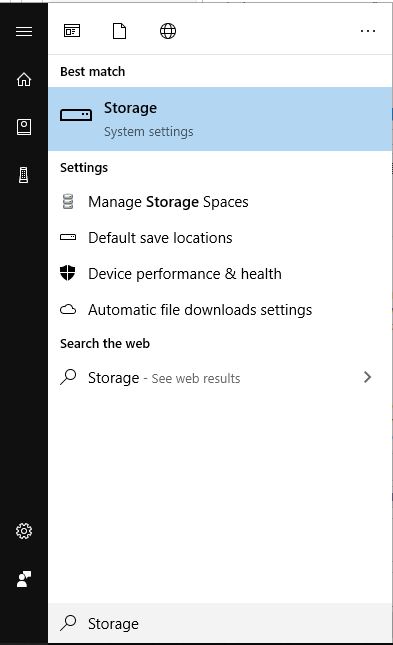
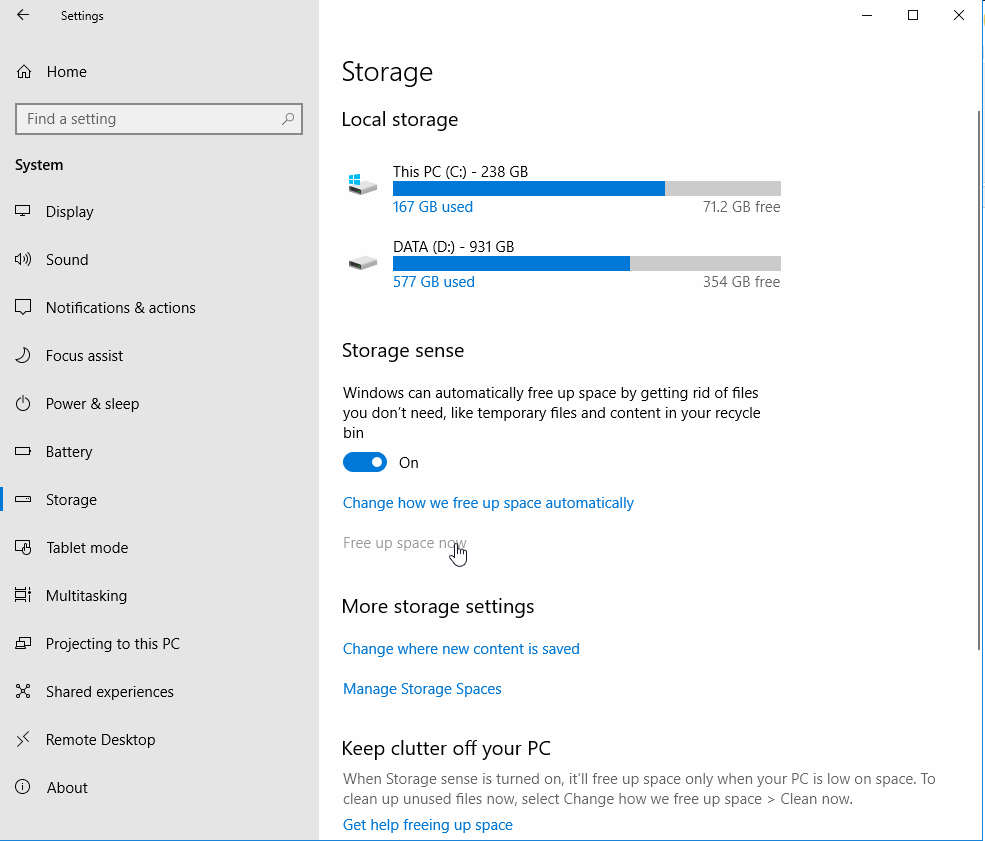
Click the Windows logo or Start Menu. Type "Storage". Select the Settings option which appears. Use this window to "Free space now". This will clear temporary files, the recycling bin, as well as any other remaining files which may not be needed on your system at this time.
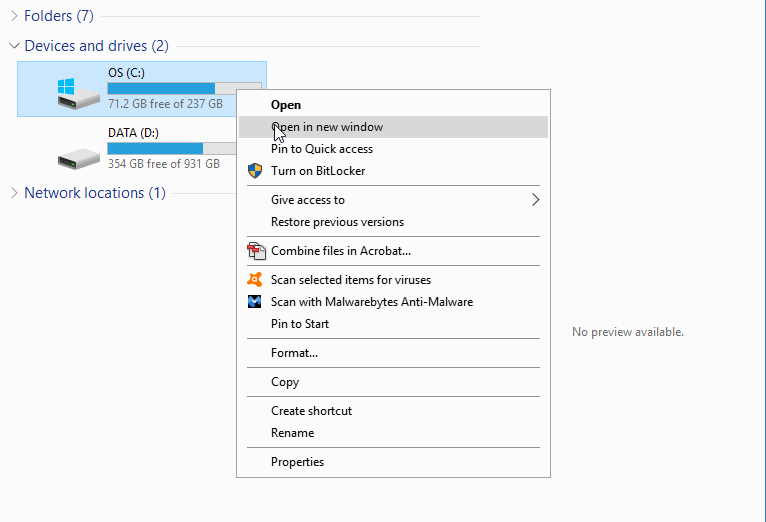
- Using a File Explorer window, go to your available drives. Right click each and go to "Properties". Inside here you can use the "Disk Cleanup" option, which is similar to the point above, then you can use the "Tools" tab to "Optimize and de-fragment" your drives. This can take some time, so this is suggested to be done at the end of the process or when you won't be using your system for some time.
- Perform an antivirus and malware scan regularly to ensure the computer isn’t infected.
- Consider using Microsoft’s built-in antivirus software Windows Defender and uninstalling third-party antivirus software. These tie up a lot of resources, can cause installation issues, and cause software not to run correctly.
- Make sure there is open space on both your main drive and the drive you are using to save your audio files or sessions. Do this by deleting unnecessary files and clearing your recycling bin regularly.
Removing Bloatware from your system
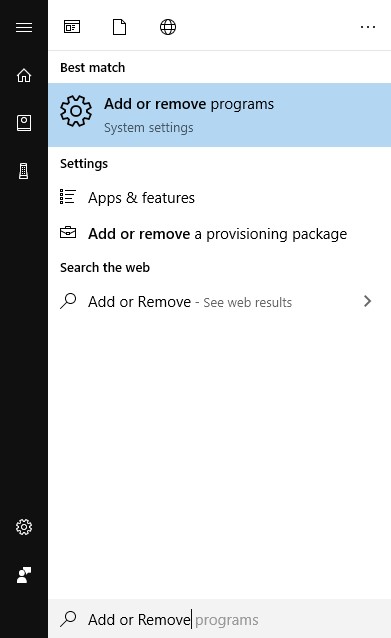
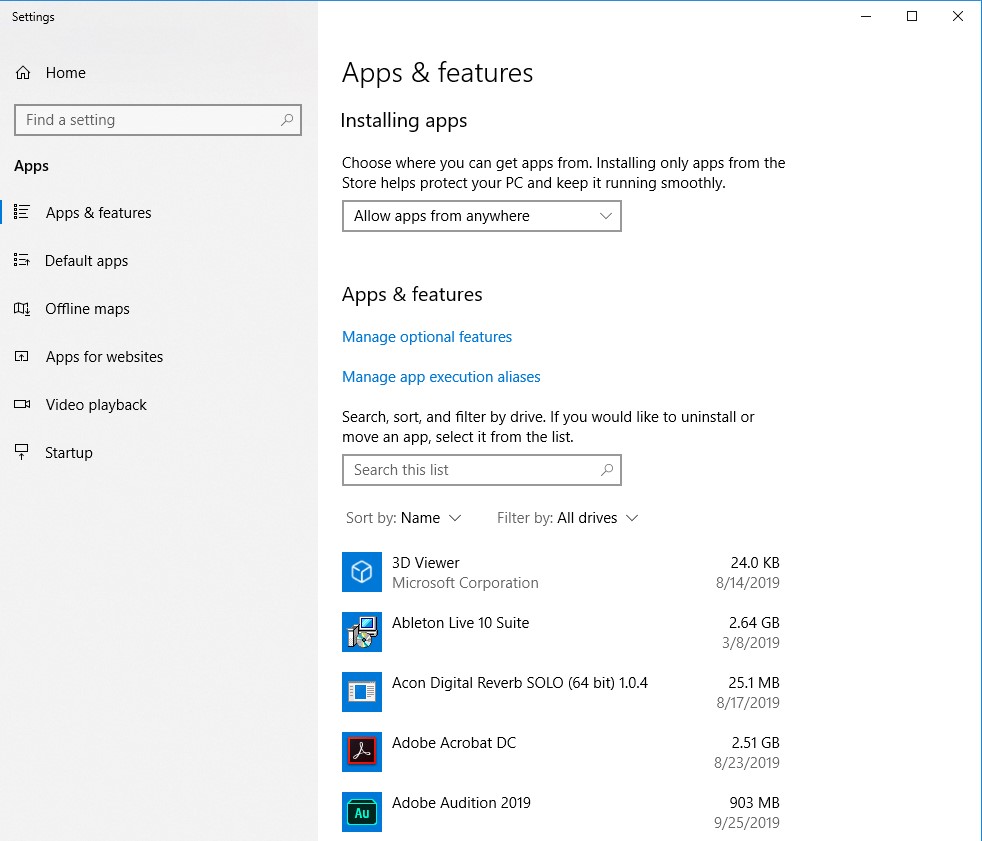
- Click the Windows logo or Start Menu. Type "Add or Remove Programs" and select the option which appears. Using this menu, remove programs which are pre-installed with pre-configured computers, which is known as bloatware. These are unnecessary programs which take up a lot of hard drive space and can use a lot of memory.
- For a more in-depth look at the same process above click the Windows logo or Start Menu. Type "Control Panel". Use this section of your system to enter the "Programs" sub-section's "Uninstall a program" option.

Disabling & closing any unnecessary background apps
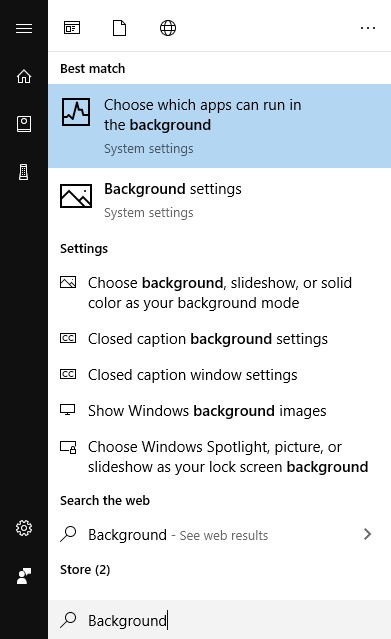
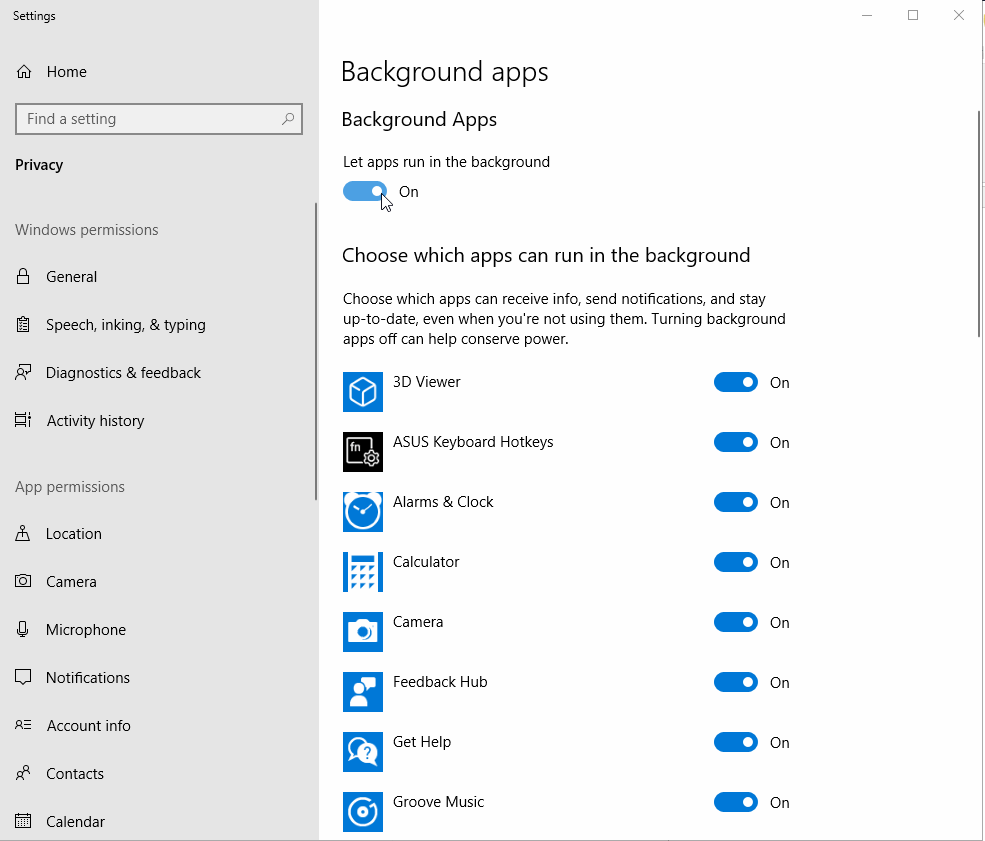
- Click the Windows logo or Start Menu. Type "Background Apps" to "Choose which apps can run in the background". Inside this window you can select the apps you wish to use, or even disable this entirely. Use the "Let apps run in the background" slider to turn this function off. This is the preferred option.
Disabling any unnecessary background services
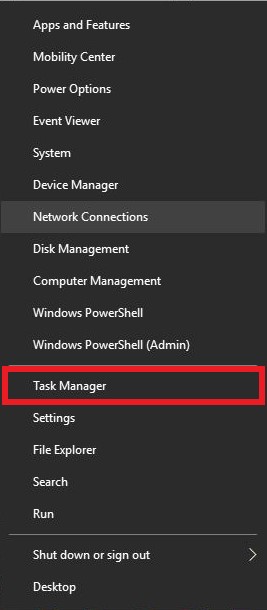
- Right-click the Windows logo or Start Menu. Select "Task Manager". Inside here disable non-essential third-party start-up "Processes" or "Services" such as: Skype, SpotifyWebHelper, OneDrive, and iTunes.
Setting the appropriate Sample Rate & Bit-depth
- When recording it can be tempting to set the Sample Rate as high as possible. Doing so however can affect your system's performance. If you system has any trouble running any particular projects or sessions, try lowering your Sample Rate. This will reduce the amount of DSP being done in real-time. "Red Book" Standard audio or CD quality uses a Sample Rate of 44.1kHz with a bit-depth of 16. Studio Quality can be considered at 48kHz and a setting of 24 for bit-depth. This can be taken to the next level when resources are available to 96 kHz or 192 kHz with 32-bit floating point as the bit-depth setting.
- On top of performance, a larger Sample Rate or Bit-depth will cause your files saved to be larger, as they contain more DATA. If you do not have a very large drive for storage, it may be best to use lower settings when recording.
Setting the appropriate Audio Buffer Size
- When recording, mixing, or mastering an appropriate Audio Buffer Size is necessary to create a nice easy work flow as well as the best experience. During Tracking (Recording) it is suggested to use a lower Audio Buffer Size. This allows for less latency (Delay between what is played and what is heard) when recording which can allow for a better, more accurate performance. We suggest starting at a 512 Audio Buffer Size, then reducing this until a good middle-ground is found. Personally, I prefer 128 or lower, but some performers can play well with a 256 Audio Buffer Size. However, during Mixing or Mastering, a lower Audio Buffer Size is not required. This is because you will not be monitoring live audio input to your system. In this case, try using an Audio Buffer Size anywhere from 512, to 1024, or 2048 when available.
Staying up to date!
- Always stay up to date with your IK Multimedia software, host program (DAW) software, and operating system! When updating, always check your software's compatibility to ensure you do not update to an incompatible operating system or host program.
IMPORTANT: If you are running Windows 10 build 1903 and haven’t updated yet, Be sure to install this update manually as it fixes many DPC latency issues.
Back to the top
Please contact our support team if you need further assistance after reading this FAQ.
FAQ ID: 1277
On iRig devices not utilizing our dedicated ASIO drivers (For a list of these iRig devices click here) Windows will limit an audio device to a single program. If you would like to get around this limitation. Please make sure to try this workaround with the steps below.
These steps will help you use AmpliTube with your favorite music and streaming services, like YouTube, Spotify, or Pandora.
- Download and install VB-Cable here. This program will allow you to route your system audio to a virtual cable.
- Download and install ASIO4ALL here. This driver set will allow multiple devices to be used at a single time on Windows.
- Restart your system to allow all the proper changes to be made to your system. This should be done with any driver installations.
- Next, open up your Control Panel and go to the Hardware & Sounds section -> Sounds. Set your systems output to the CABLE Input (VB-Audio Virtual Cable).
- Open the latest version of AmpliTube 4. If you do not yet have AmpliTube, download this from My Products.
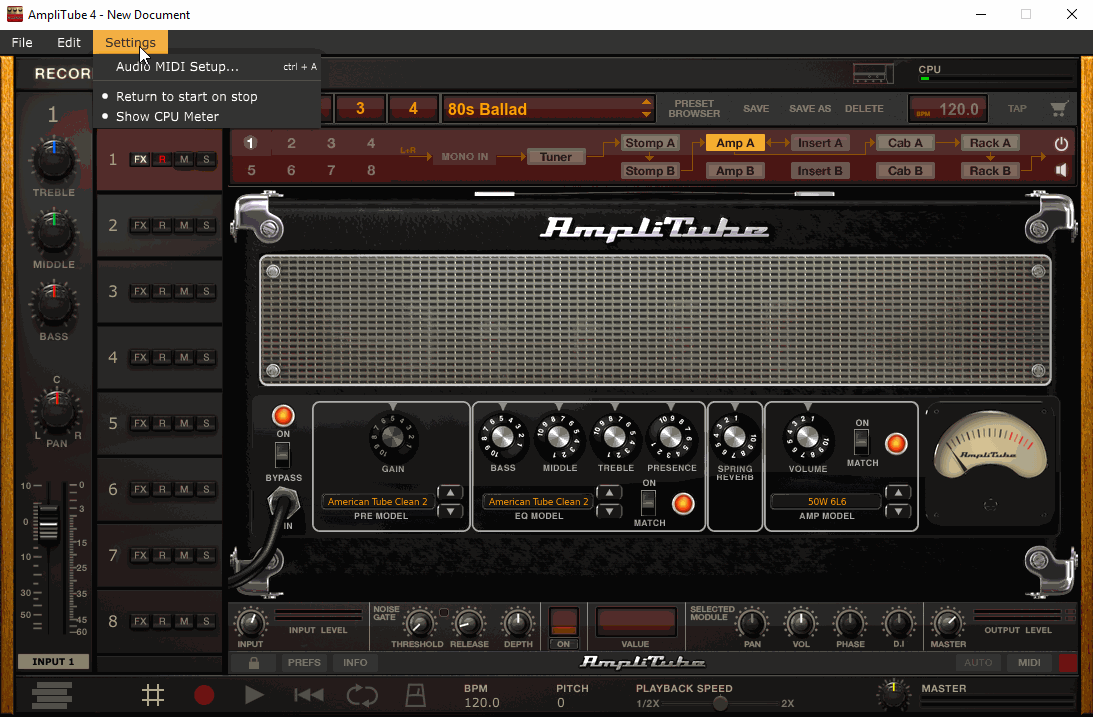
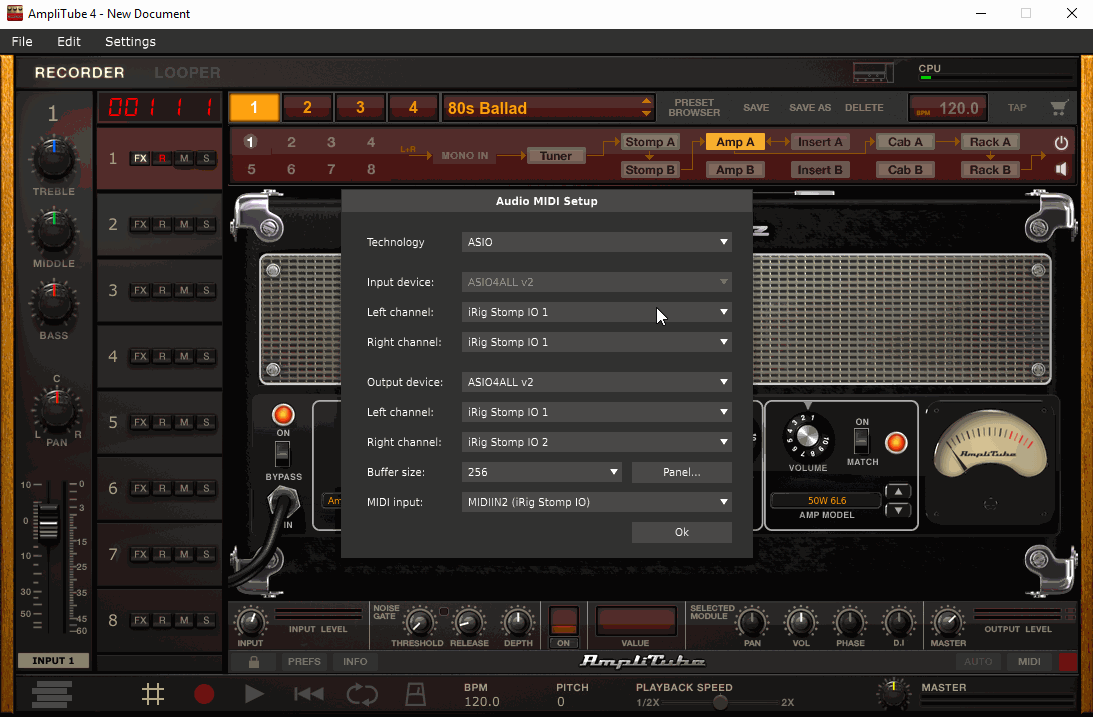
- Go to the Audio/MIDI Set Up under Settings in AmpliTube 4 to select ASIO4ALL as your audio input and output device.
- Next, using the ASIO4ALL panel activate both your audio interface and VB Cable.
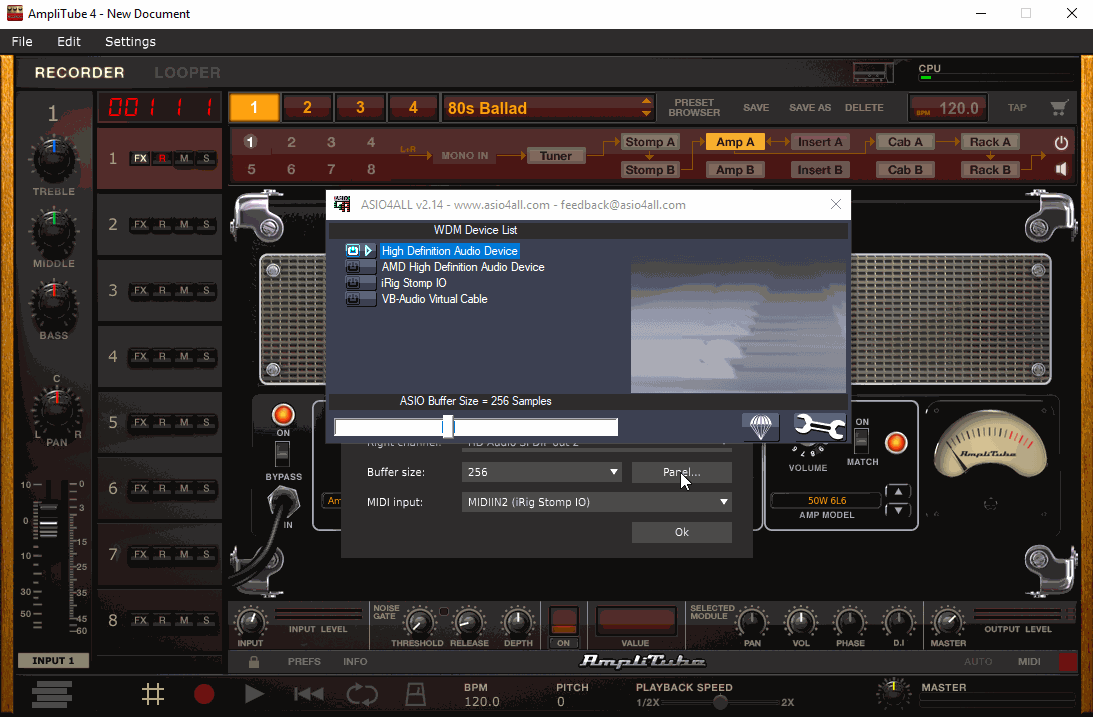
- Inside your Audio/MIDI Set Up window, select Left Input (Input 1) as your iRig or instrument input, then select "VB-Audio Point 1" as the Right Input (Input 2). Select your Output device as your systems output.
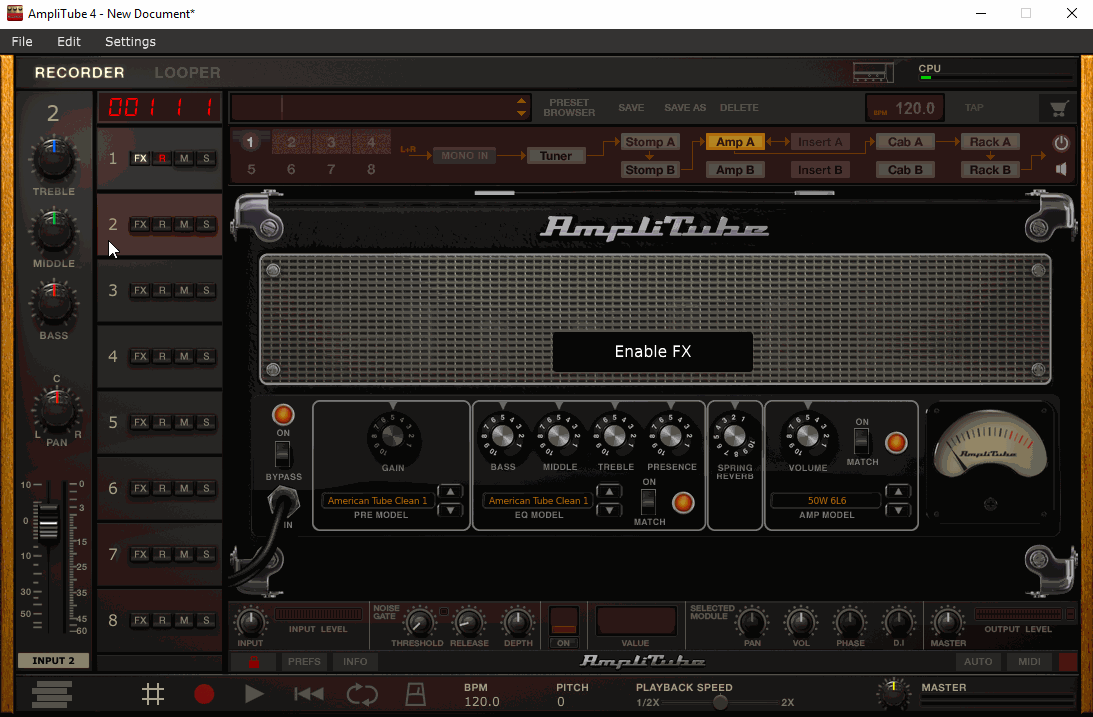
- Back inside AmpliTube 4 notice Channel 1 is set to Input 1 (Your iRig) by default. Set Channel 2 to Input 2 (Your VB-Audio Cable) press the "R" (Record enable) on both tracks are you are ready to go!
If you need additional help after reading this FAQ, contact our support team here.
FAQ ID: 1236
Check your device's user manual for Windows compatibility information. Most iRig units with a USB port are Windows/PC compatible. Product user manuals are stored in My Products after registration. For a list of iRig devices with dedicated ASIO drivers click here.
To get started on Windows if your iRig does not have dedicated ASIO drivers, you will need to download a third party driver called ASIO4ALL. Although it is a third party driver, we have tested it in several Windows configurations with great results. This third party driver allows you to select different input, and output sources, which is needed with some iRig models that do not offer an output. For example, the iRig HD or iRig Acoustic Stage.
This workaround is compatible with Windows XP, Windows Vista, Windows 7, Windows 8, and Windows 10.
Please follow these steps to setup your device on Windows. Please note that there are interfaces that may not work properly with the below steps:
- Download ASIO4ALL
- Once downloaded, make sure you install ASIO4ALL and restart your system. This is required when installing any drivers to your Windows/PC system.
Note: It is suggested to install the Offline Settings option. This will allow you to adjust your ASIO4ALL settings before launching your audio software. - Launch the latest version of AmpliTube or your DAW. AmpliTube can be downloaded from My Products.
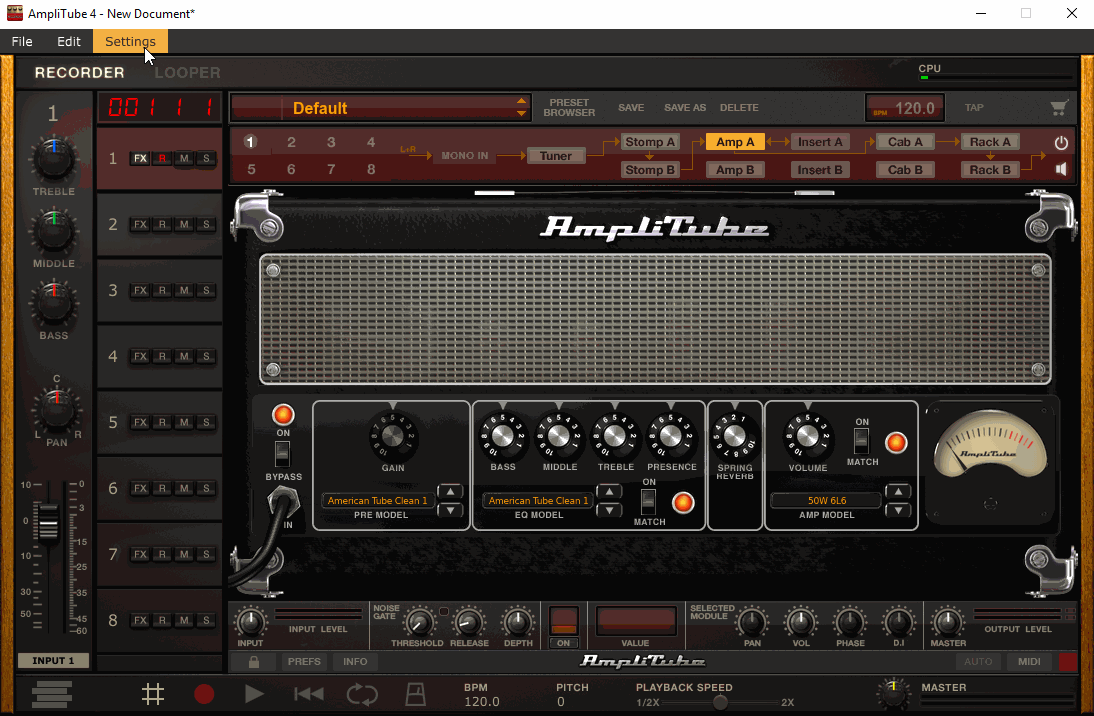
- In AmpliTube, make sure to click on Settings > Audio/MIDI Setup. Select the technology as an ASIO style driver, then choose ASIO4ALL as the Input/Output device.
- Click to view the 'Panel', this will open the ASIO4ALL settings.
- Inside the ASIO4ALL Panel, click the 'wrench' icon in lower right corner to show all available sub-devices, a red 'X" will appear over the icon was clicked. This option is necessary for you to select multiple interfaces for use. You will see various devices listed under the WDM Device List.
- Click the enable/power button on both the iRig and your other interface that you will be listening to the output from, then turn all other devices off. See image.
- Once the above is set, view your AmpliTube Settings > Audio/MIDI Settings window once again. Under Input channels, you can now view and select iRig as your input. Under Output channels, make sure your interface you are monitoring from is selected.

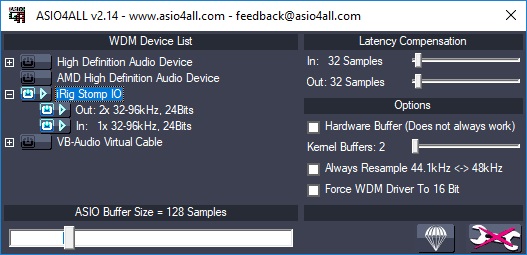
Note: Do NOT enable the 'Hardware Buffer' under Options in the ASIO4ALL panel, as this causes poor performance.
Once you have audio playing back, you are ready to play! To adjust the latency times experienced, use the audio buffer size in the ASIO4ALL control panel. The lower the audio buffer size, the less latency will be experience. The higher the audio buffer size, the more latency will be experience. Remember that lower audio buffers comes at a cost, a lower value will require more processing power to run smoothly. To avoid clicks & pops from too low of a value, try and find a good medium value for your system. We suggest starting at 512, then going to 256, or 128 if your system allows.
Note: On less powerful machines, the Kernal Buffer can be adjusted. Increasing this value will increase latency.
For the full ASIO4ALL user manual click here.
For a deeper look into optimizing Windows 10 for audio, read this FAQ.
For help using AmpliTube with YouTube, Spotify or other streaming platforms, click here.
If this FAQ did not help get you started, please reach out to our support team here.
FAQ ID: 1076
To use your iRig with your Headset with Microphone, or any other headphone with a microphone, follow these steps:
- Disconnect your iRig and the Apple Headset with Mic.
- Open AmpliTube. Click on MENU, click on the SETTINGS page.
- Connect the Apple Headset with Mic first. You'll probably be asked if you are using "Headphones or Speakers", click on HEADPHONES. The input will be listed as "Input: Headset Jack".
- Next, connect iRig. The Input will now change to "Digital Audio". You should now be able to play through iRig and listen through your Headset with Mic.
If you connect the iRig first, then the Apple Headset, the iOS device being used will automatically select the Headphone Jack as an input. Make sure you connect the Headset in first, then connect iRig second.
If you need any extra help after reading this FAQ, reach out to our team here.
FAQ ID: 1078
With the latest version of macOS, version 10.14 (Mojave) or later, Apple has introduced a new section in Preferences for Microphone Permissions. When disabled, these preferences can prevent audio input in any software which can accept external audio input. This can affect AmpliTube 4, ARC System 2.5, or any of our Mac compatible audio interfaces being used on macOS 10.14 or later.
To access and adjust your Microphone Permissions please follow these steps:
- In the upper left hand corner of your screen, click on the Apple Icon, then select System Preferences. Inside here, go to the Security & Privacy section to find the Privacy tab.
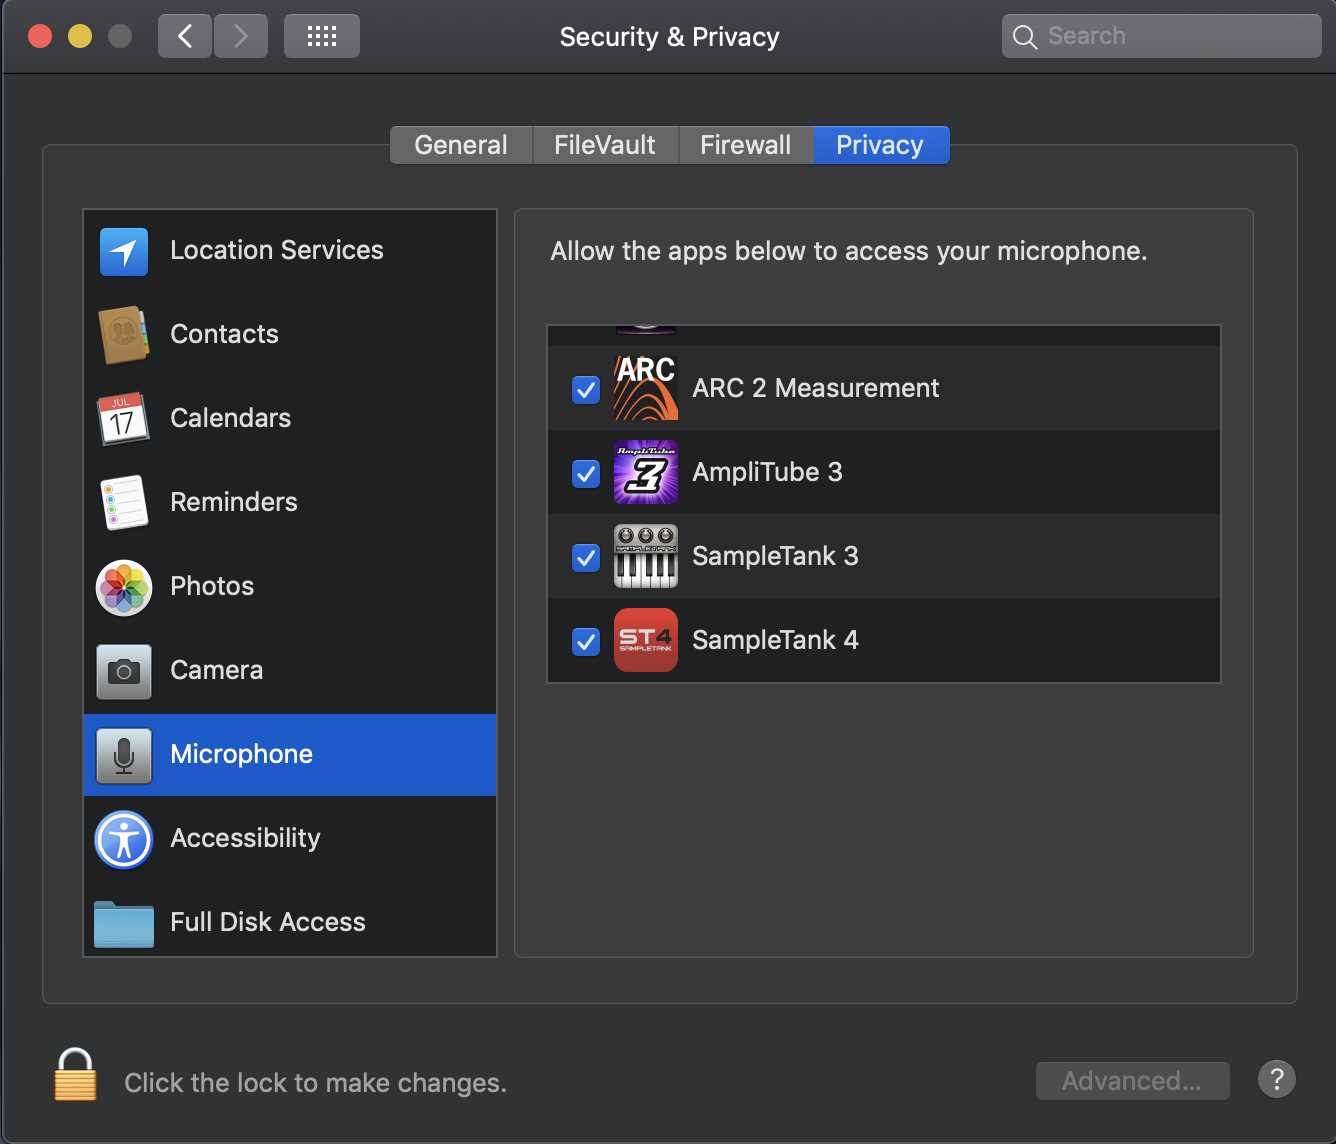
- Make sure you have any audio application(s) installed prior in order for them to be listed in the Microphone Permissions list. Click on the Lock Icon on the bottom left of the Privacy Window, enter your administrative password, and you will be able to make changes to the Microphone permissions. Once your application is checked, click on the Lock Icon again to save the changes.
If you need extra help after reading this message, please contact us here.
FAQ ID: 1243
Connecting your headphones to your Android device's headphone jack will not work, as the processing is being handled within the iRig UA itself.
Due to this, you cannot output the guitar through your Android speakers.
FAQ ID: 1117
This workaround is compatible with Windows XP, Windows Vista, Windows 7, Windows 8, and Windows 10.
Please follow these steps to setup your device on Windows:
1. Download ASIO4ALL v2 here: http://www.asio4all.com/
2. Install ASIO4ALL.exe
3. Launch AmpliTube 3 or your DAW
4. In AmpliTube 3, click on Settings > Audio/MID Setup. Select ASIO driver, then choose ASIO4ALL v.2 driver.
5. Click to view the 'Panel'
6. You are now viewing the ASIO4ALL Panel, click the 'wrench' icon in lower right corner, a red 'X" will appear over it. You will see various devices listed under the WDM Device List.
Click the enable/power button for the iRig UA.
7. Once the above is set, view your AmpliTube 3 Settings > Audio/MIDI Settings window once again. Under Input channels, you can now view and select iRig UA as your interface. Note that iRig UA may appear as "USB Audio Device 1" and "USB Audio Device 2" for your Left and Right channels.
Note: Do NOT enable the 'Hardware Buffer' under Options in the ASIO4ALL panel, as this causes poor performance.
You are now ready to play!
FAQ ID: 1120
All iRig devices must be connected to a compatible device (Mac/PC, iOS, or Android) with a compatible app open and running to operate properly.
If you are unsure what apps to use, please refer to your product's documentation or registration email. Your iRig can be registered here or in the Authorization Manager. All user manuals are stored in My Products after the registration process.
In IK apps like AmpliTube CS or VocaLive CS which handle real-time audio input. The Menu > Settings should automatically detect your iRig. This means the input at the top of this page will switch to "Input: Headset Jack" or "Input: Digital Device" depending on your iRig. If this is not the case, proceed with the steps below.
Try these steps for any issues with Analog Devices (3.5mm Headphone port - TRRS):
- Remove anything which could be getting in the way of a full connection. This includes protective casing, extension cables, splitter or charging cables.
- Clean out your device's headphone port with compressed air or contact cleaner.
- If possible, try your iRig on another device/system. This will help confirm if your device's port is having any issue.
- Contact support here
Try these steps for any issues with Digital Devices - (Lightning/30-Pin/Micro USB)
- Remove anything which could be getting in the way of a full connection. This includes protective casing, extension cables, splitter or charging cables.
- Clean out your device's Lightning port with compressed air or contact cleaner.
- Try using your device on a system which uses a different cable. If your device does not power up on Mac/PC, try this device on an iOS (iPhone/iPad/iPod) device or vise verse. This will help determine if your cable could be having issues.
- Contact support here
FAQ ID: 1232
To get the most out of your iRig follow these quick and easy steps. Keep in mind, while these suggestions use only IK Multimedia apps, your iRig will work with any apps which allow headset or digital audio input (Depending on your device). In any apps, the concepts mentioned here will be applicable.
For users with issues getting their device to power on at all, check out this FAQ here. Anyone with issues getting audio from their apps this in-depth FAQ here will help.
Select your iRig type:
Note: While this FAQ is based on iOS optimizations, remember that your iRig device is also compatible with Mac/PC. See your iRig device's specific FAQ page for complete details on
optimizations for these platforms.
iRig Microphones
The first step to getting started is using a compatible app to activate your iRig. Download one of the following apps to get started. These all work very similarly, but can be used for different purposes.
- Set your volume On analogue iRig units like the iRig Mic, use the iOS headphone volume buttons to set your output level. On digital iRig units, like the iRig Mic HD 2, use the volume on the iRig itself. Set this to a normal level.
- Set your gain level Using the gain control on your iRig, set your input gain. If the input level is set too low you will have noise in your signal. If the input level is set too high you will have a distorted signal. When using analog iRig devices, like the iRig Mic, make sure to check your Menu -> Settings for additional input and output levels.
- Set your Latency & Quality Settings Use the Menu -> Settings in your app to set your Latency setting from LOW to ULTRA LOW. If you hear clicks and pops, disable AUTO-SLEEP, and set Latency to LOW.
*Never turn the “NO FEEDBACK” option OFF in the Menu -> Settings page when using headphones or earbuds, to avoid possible feedback.
*Never plug or unplug your headphones when an app is open and running.
*For longer recording sessions you may want to enable Airplane mode on your device
Guitar/Bass/Instrument oriented iRig devices
When using an iRig based on guitar or bass use, we suggest using AmpliTube CS. This app has a bunch of settings to adjust the signal coming in and going out of your app.
Note: Most iRig devices include in-app gear to get you started. Check our iRig device's registration email for a list of includes gear. Register your product here.
- Set your volume On analogue iRig units like the iRig 2, use the iOS headphone volume buttons to set your output level. On digital iRig units, like the iRig Stomp I/O, use the volume on the iRig itself. Set this to a normal level.
- Set your gain level Using the gain control on your iRig, set your input gain. If the input level is set too low you will have noise in your signal. If the input level is set too high you will have a distorted signal. When using analog iRig devices, like the iRig 2, make sure to check your Menu -> Settings for additional input and output levels.
- Set your Latency & Quality Settings Use the Menu -> Settings in AmpliTube to set your Latency setting from LOW to ULTRA LOW. Enable OVERSAMPLING for high quality audio. If you hear clicks and pops, disable OVERSAMPLING, AUTO-SLEEP, and set Latency to LOW.
*Never turn the “NO FEEDBACK” option OFF in the AmpliTube app SETUP page when using headphones or earbuds, to avoid possible feedback.
*Never plug or unplug your headphones when AmpliTube is open and running.
*For longer recording sessions you may want to enable Airplane mode on your device
FAQ ID: 1281


