FAQ
If you could not find an answer to your problem in our FAQ pages, please submit a Tech Support Form
Click here to back to trending articles.
If your Authorization Manager is not accepting your serial number, this may be because it found a wrong character inserted to your serial.
* Typing a 0 ("zero" number) instead of an O ("o" letter)
* Typing 1 ("one" number) instead of an I ("i" letter)
* Typing 2 ("two" number) instead of an Z ("z" letter)
* Typing 5 ("five" number) instead of an S ("s" letter)
* Typing 8 ("eight" number) instead of an B ("b" letter)
* Typing a "." (point) instead of a "-" (minus), and vice-versa, is one of the most common occurrence.
Suggestions:
* When possible, please copy and paste the information.
* Cut off all the leading and trailing spaces, these are seen as 'characters'.
* Please type all codes UPPERCASE during the installation and registration process.
* Check that the Serial Number that you are entering matches with the product installed.
If you still need help after reading this FAQ, contact our support team here.
FAQ ID: 9
Registering this serial number unlocks any gear associated with your product, as well as any associated warranty with your product.
Example: "ATX30-xxxxxxxx-xxxxx".
You will need the Serial Number to register your IK product via the Authorization Manager or the Product Registration page.
FAQ ID: 10
The Serial number for your product is written on the Registration Card included with your product packaging, inside the license envelope. For Digital Delivery items, this serial will be found inside an email received after purchase.
For a clear characters' identification, please refer to the legend at the bottom of the card.
Note: the zero can easily be identified in your Serial Number because it is crossed by a line).
If you need help after reading this FAQ, please contact us here.
FAQ ID: 11
FAQ ID: 13
Becoming an IK Multimedia user is easy!
Register now for a free copy of AmpliTube 4 Custom Shop, T-RackS 5 Custom Shop, and SampleTank 3 Custom Shop, and Syntronik Free. You can also become a registered user by purchasing one of our award winning products through an authorized IK Multimedia dealer.
You can view dealers in your area by clicking here.
FAQ ID: 17
If you purchased a Digital Delivery product from the IK webstore, the Serial Number will be automatically registered to your account for you.
If you ordered a boxed software product, you can register in the Authorization Manager application.
Click here for the Authorization Manager.
For legacy software products, please use the Legacy Registration page here.
For Mobile hardware products, you can register here or using the Authorization Manager.
For Mobile apps, please launch the app and register within the app by clicking the MENU button, then 'Account'.
FAQ ID: 18
Launch the Authorization Manager application and follow the on-screen steps. If you have yet to install the software, the Authorization Manager will provide a download link at the final step.
Once installed, complete the Authorization Manager process. The software is now authorized and ready to use!
FAQ ID: 29
At this time, the following products are updated and working on this latest version of macOS.
- Syntronik 1.2.0b
- T-RackS 5.2.2b
- AmpliTube 4.9.0B
- MODO BASS 1.5.1b
- MODO DRUM 1.1.0
- Hammond B-3X version 1.1.1
- SampleTank 4 version 4.0.9
- AXE I/O Control Panel 1.1b
- Custom Shop 1.9
- Authorization Manager 1.0.27
- UNO Drum Editor 1.1.0b
- UNO Synth Editor 1.1.0b
- UNO Drum Anthology Libraries (1.0.0)
- UNO Drum Firmware Update (1.0.2)*
- UNO Synth Firmware Update (1.1.4)*
- iRig Firmware Update (1.12.0)
- iRig Keys I/O Firmware Update (1.2.0)
Below is both a video and list of steps which walk through the process shown in the video:
-
Run installer
-
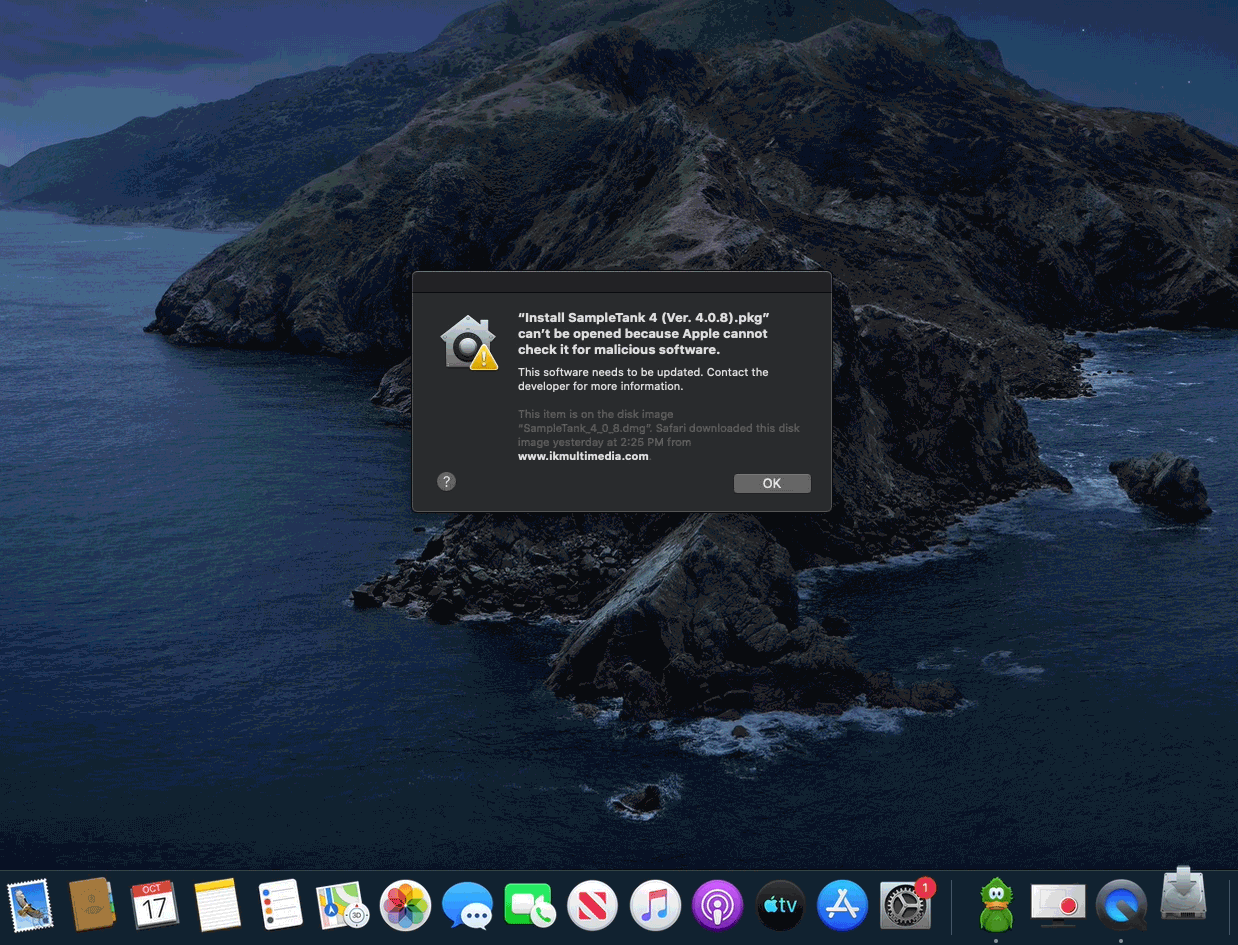
macOS 10.15 Catalina will display a message stating that the installer can’t be opened because Apple cannot check it for malicious software.
-
Close this window by clicking on OK
-
Open System Preferences and go to “Security & Privacy”
-
At the bottom of the General tab, you will see the option to open the installer. Click on “Open Anyway” to run the installer.
-
The installer will now open, allowing you to complete the installation process!
FAQ ID: 1278
Currently, these programs are working with macOS Catalina and we have provided compatible updates to the following programs in your IK User Area:
- ARC System 3.0
- Syntronik 1.2.0b
- Miroslav Philharmonik 2.0.6
- T-RackS 5.2.2
- AmpliTube 4.9.0
- MODO BASS 1.5.1b
- MODO DRUM 1.1.0
- Hammond B-3X version 1.1.1
- SampleTank 4 version 4.0.9
- AXE I/O Control Panel 1.1b
- Custom Shop 1.9
- Authorization Manager 1.0.27
- UNO Drum Editor 1.1.0b
- UNO Synth Editor 1.1.0b
- UNO Drum Anthology Libraries (1.0.0)
- UNO Drum Firmware Update (1.0.2)*
- UNO Synth Firmware Update (1.1.4)*
- iRig Firmware Update (1.12.0)*
- iRig Keys I/O Firmware Update (1.2.0)
*Requires forcing installation via right click. Notarization to follow.
Please check this page or your IK product's specifications page for full information on the current officially compatible operating systems.
If you need any extra help or information after reading this FAQ, please contact our support team.
FAQ ID: 1264
FAQ ID: 915
You can also find your Serial Number in your User Area > My Products > product name > Serials / Authorizations section.
Access the User Area here.
FAQ ID: 919
Make sure the latest plugin version is installed, available in the IK User Area > My Products.
Click here to access the User Area.
To authorize your IK products using the offline authorization process, please follow the below steps:
1. Save the authorization request file (Authorization Request.html) on the computer that is not connected to the Internet.
2. Copy the file to a computer that is connected to the Internet while keeping the Authorization Manager open on the first computer.
3. Double-click the 'Authorization Request.html' file on the computer that is connected to the Internet. It will open your web browser.
4. Follow the instructions on your browser. Insert all of your serial numbers that you want to authorize. The last step will ask you to save a second file (Authorization.xml) in the computer that is connected to the Internet.
5. Copy the 'Authorizations.xml' file to the computer that is not connected to the Internet.
6. Load the 'Authorization.xml' file in the Authorization Manager on the computer that is not connected to the Internet to authorize your software.
Expanded steps -
The first page will let you create the authorization request file (Authorization Request.html) on the computer that is not connected to the Internet. Click the SAVE AUTHORIZATION FILE button to create the 'Authorization Request.html' file that is necessary to bring the current computer details to the one that has an Internet connection. Choose carefully where to save the file (on your Desktop will be fine) because you will have to transfer it to the computer that is connected to the Internet in the next step.
Click on the NEXT button after saving the 'Authorization Request.html' file.
Take the 'Authorization Request.html' file you have just saved and copy it (with a USB drive, etc.) to a computer that is connected to the Internet. After you have transferred the file, double-click it and follow the instructions.
Don't close the Authorization Manager as you will have to return back to this page after having completed all the steps on the computer that is connected to the Internet.
After double-clicking the 'Authorization Request.html' file your browser will open.
Enter your User Name and Password, then click the LOGIN button.
The final page displayed on your browser will ask you to create the 'Authorization.xml' file. Click the DONE button to create the 'Authorization.xml' file.
IMPORTANT: To finish the authorization process, you must make sure that the software is installed on the computer that is not connected to the Internet. If you have not installed the product yet, please install it on the computer that is not connected to the Internet before loading the 'Authorization.xml' file into the Authorization Manager.
Now you can proceed to copy the 'Authorization.xml' file to the computer that is not connected to the Internet.
Return to the Authorization Manager page that you have left open on the computer that is not connected to the Internet and press the NEXT button.
Click the LOAD AUTHORIZATION FILE button to load the 'Authorization.xml' file you transferred from the computer that is connected to the Internet. Please note that the 'Authorization.xml' is different from the one you created by clicking the SAVE AUTHORIZATION FILE button (Authorization Request.html'. After loading the 'Authorization.xml', click on the NEXT button to proceed to the final page. In case the software is not installed, the Authorization Manager will display the "Not Installed products" message.
FAQ ID: 1045


