
ステージからレコーディングまで様々なシーンで活躍してくれる
iPhone/iPad対応ボーカル専用アプリ
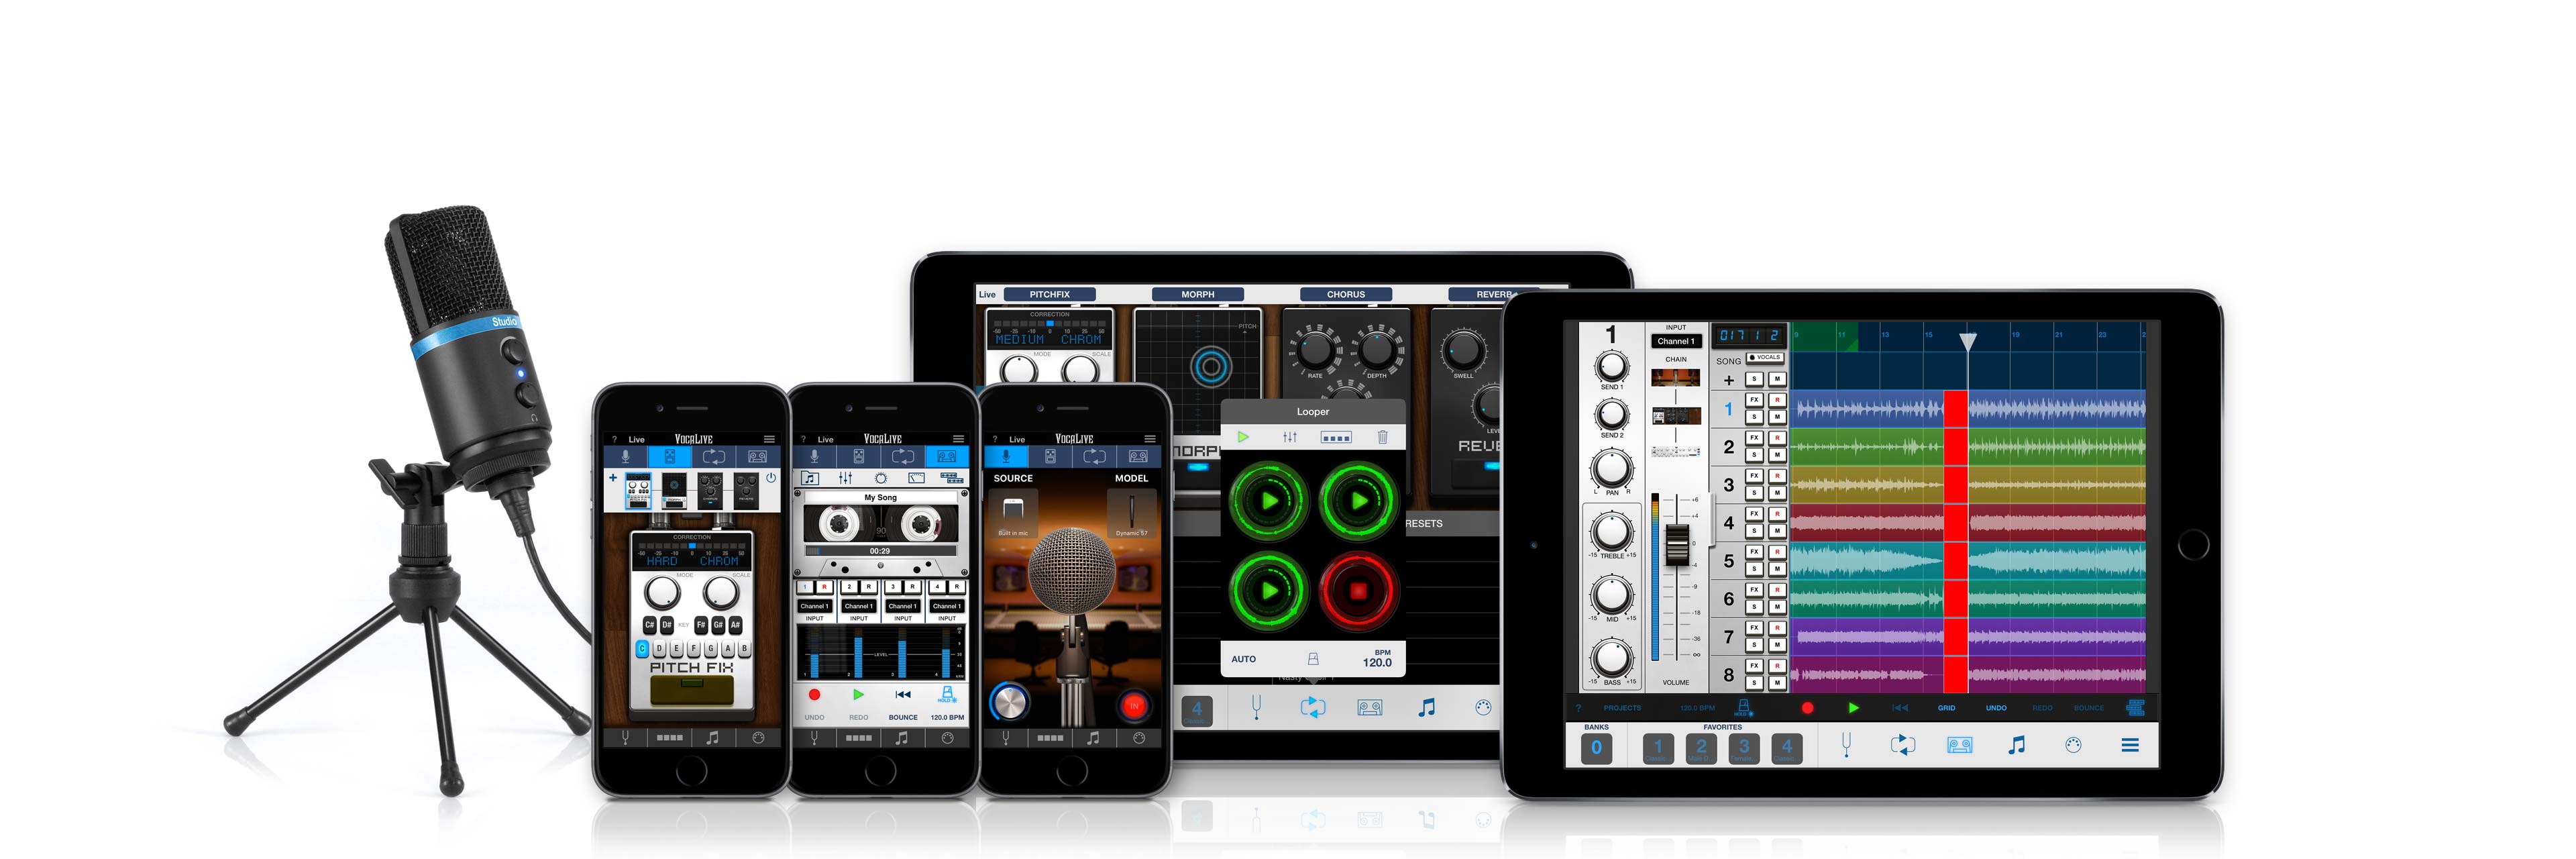
VocaLiveは、iPhone/iPod touch/iPadでお使いいただけるボーカル専用エフェクト&レコーダー・アプリです。
12種類内蔵されたボーカル / スタジオ・エフェクトの中から、最大4種類同時使用することで、高品位なボーカル・サウンドでのパフォーマンスを実現してくれます。
加え、てマルチ・チャンネル対応オーディオ・インターフェースと併せてお使いいただくことで、最大8トラックのマルチ・トラック同時録音が可能です。
VocaLiveには、お持ちのマイクロフォンをビンテージのスタジオ・マイクのサウンドのように変えてしまうMic Roomや、クリエイティブなアイディアを形にしてくれる4トラックのルーパー機能(アプリ内課金)なども装備しています。
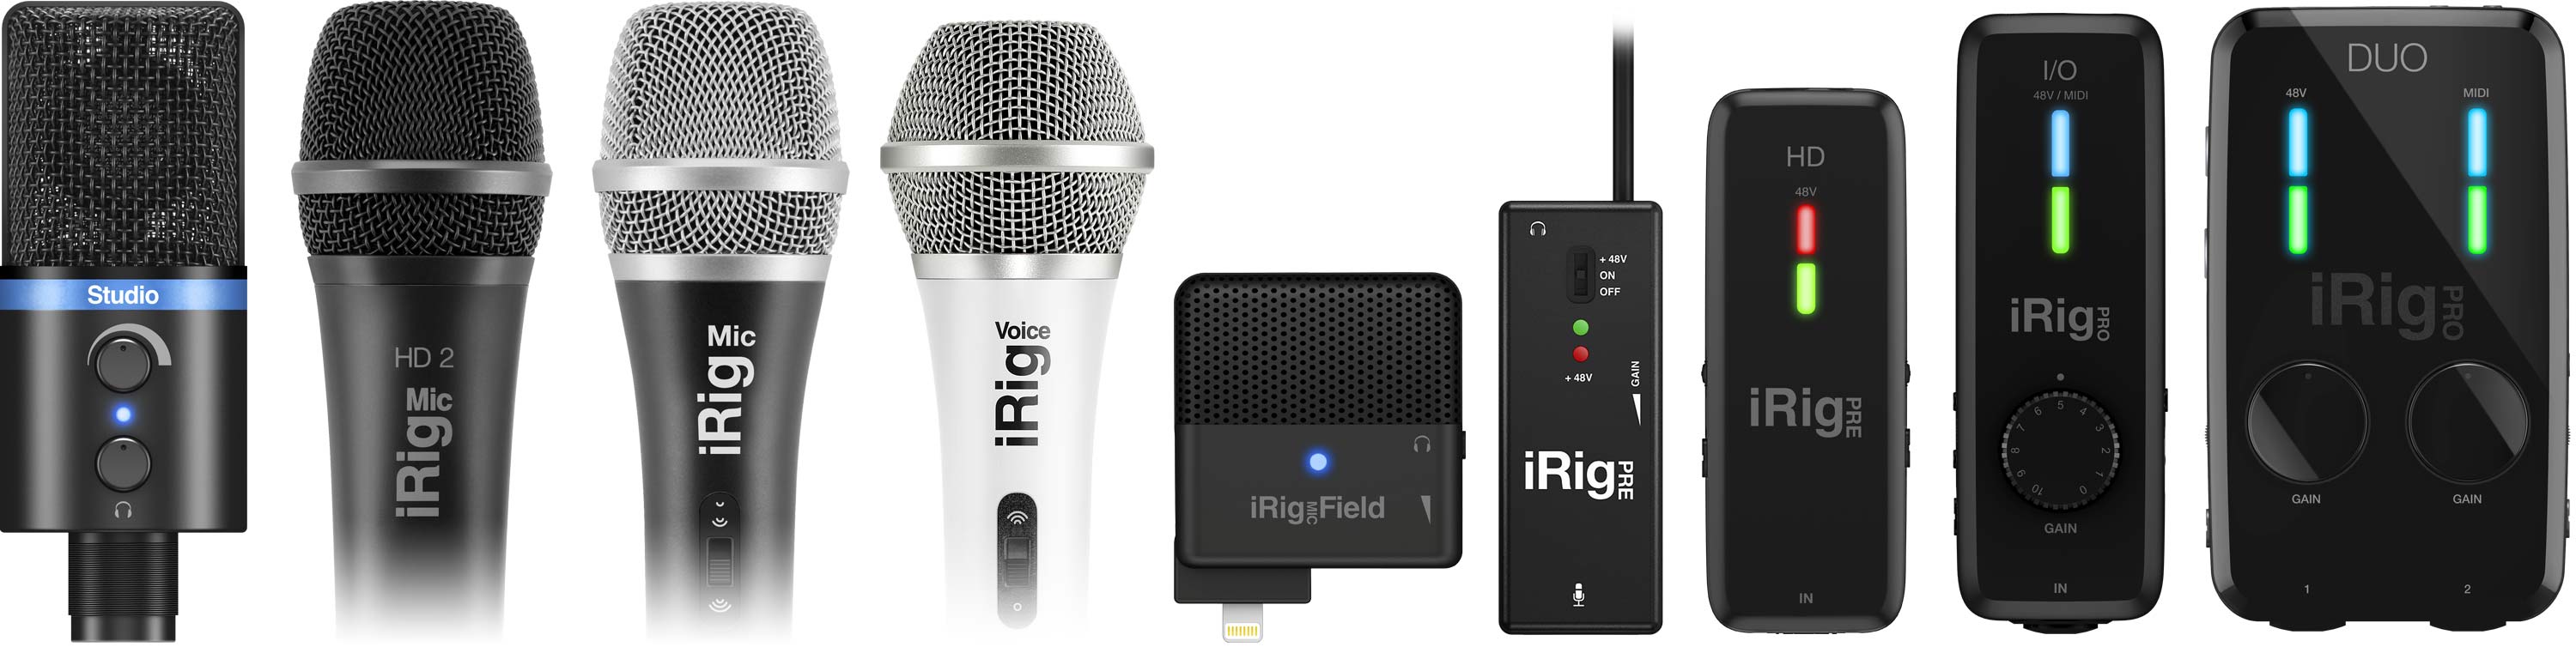
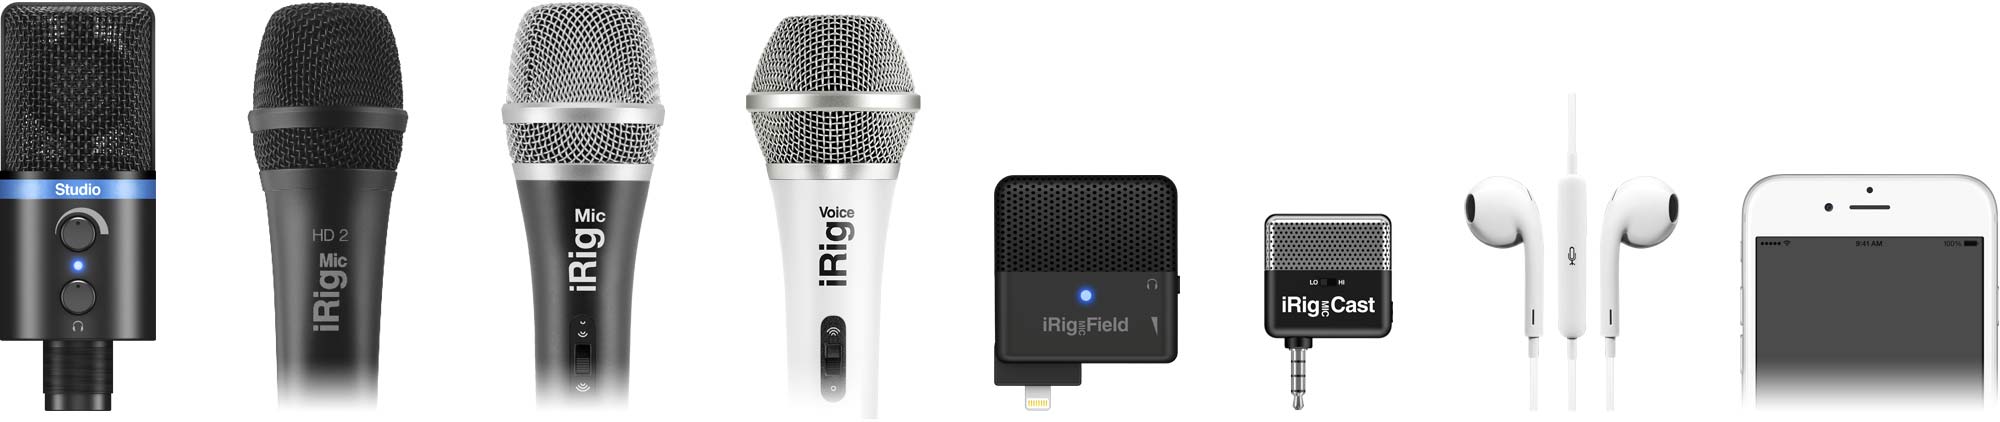
VocaLiveはiPhone/iPad内蔵のマイクやヘッドセットでもお使いいただけますが、最高のパフォーマンスを引き出すためには、IKのiRig Mic HD 2やiRig Mic Studioといったデジタル・マイクや、iRig Mic、iRig Mic Lavなどのアナログ・マイク、そしてマイク・プリアンプ内蔵しXLR / 標準コンボ端子も装備したiRig Pre、iRig Pre HD、iRig Pro I/O、iRig Pro Duoなどのオーディオ・インターフェイスのご使用をお薦めいたします。
iRig Pro Duoなら、2トラックの同時録音が可能ですから、ボーカルとギターの伴奏、デュエットなど、それぞれトラックに別々に録音することもできます。

パワフルなリアルタイム・エフェクト機能
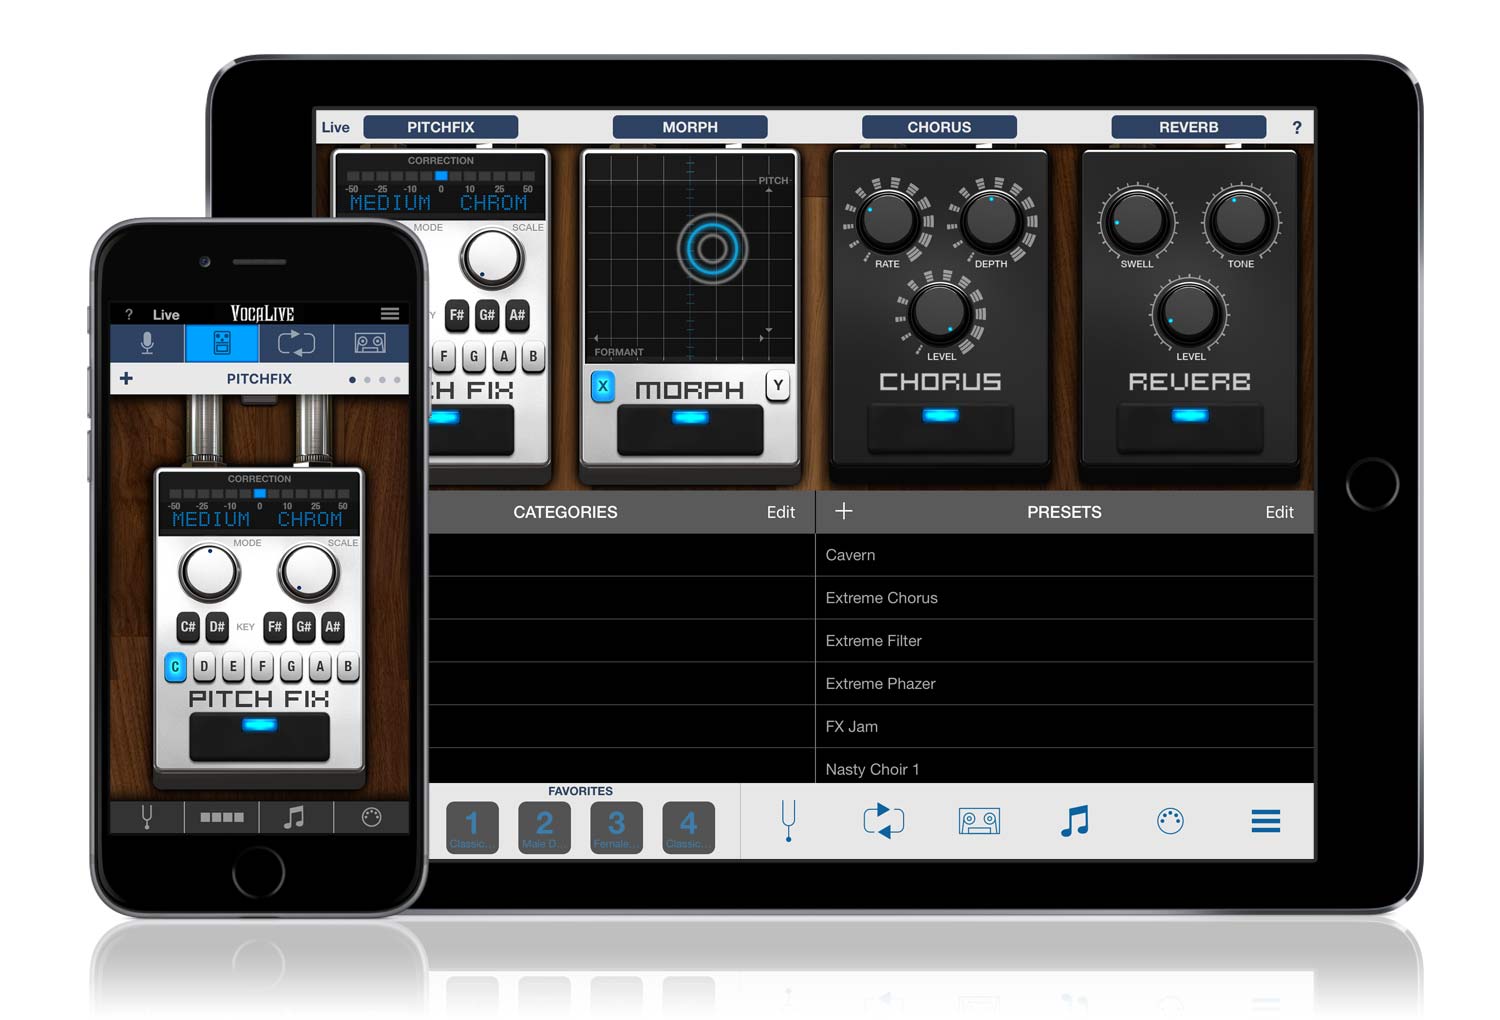
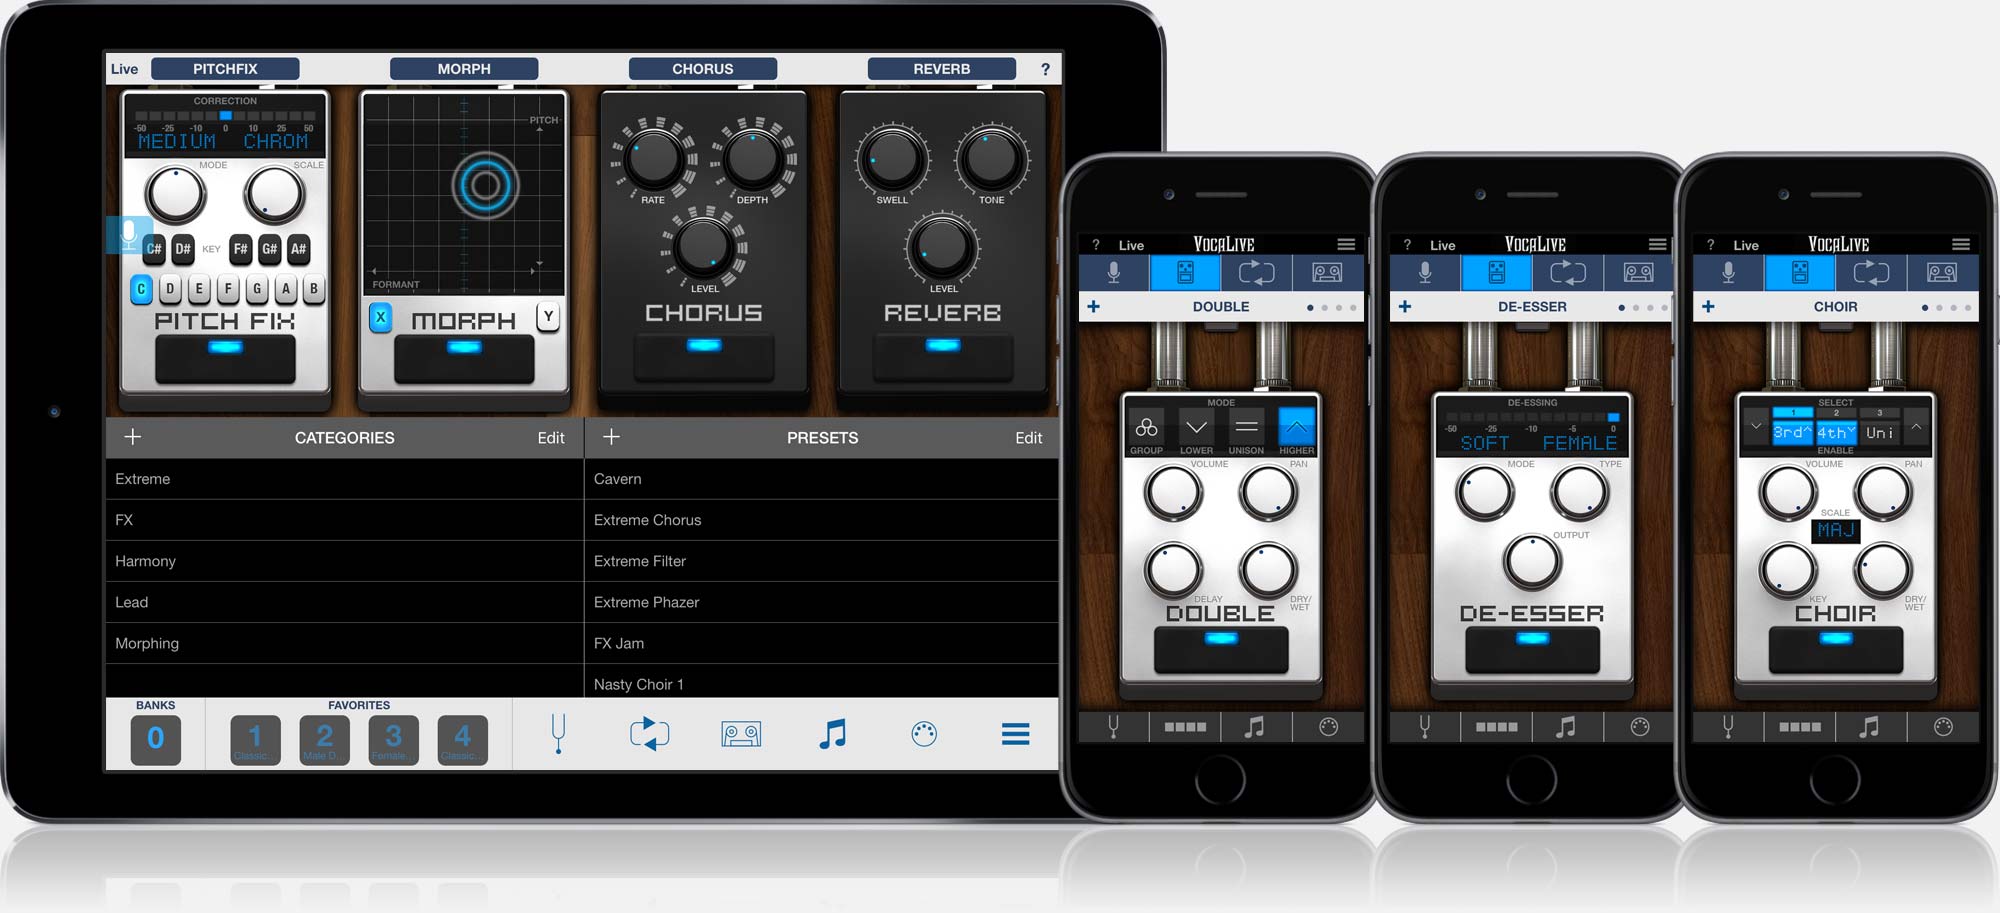
VocaLiveには、ボーカルに特化したプロ仕様のリアルタイム・エフェクト12種類が装備されており、最大4種類を同時使用して、リアルタイムにエフェクト処理を行うことが可能です。そう、まるで、パワフルなスタジオ機材一式をポータブルなモバイル端末に入れて持ち運んでいるかのよう。
VocaLiveには、Pitch Fix (ピッチ補正)、Choir (3声のハーモナイザー)、Morph (フォルマント/ピッチをX/Y軸パッドでモーフィング) 、Double (ダブラー)、De-Esser (歯擦音を抑えるディエッサー)など5種類のボーカル専用エフェクトが装備されています。(Doublerは、ユーザー登録後にロック解除されます。)
加えて、Reverb、Delay、Parametric EQ、Compressor、Chorus、Phazer、Envelope Filterといった定番のスタジオ・エフェクト7種類も装備しています。
こうしたリアルタイム・エフェクトを自由に組み合わせて、あなただけのオリジナルのボーカル・サウンドを創りあげることができるのです。
VocaLiveをステージへ
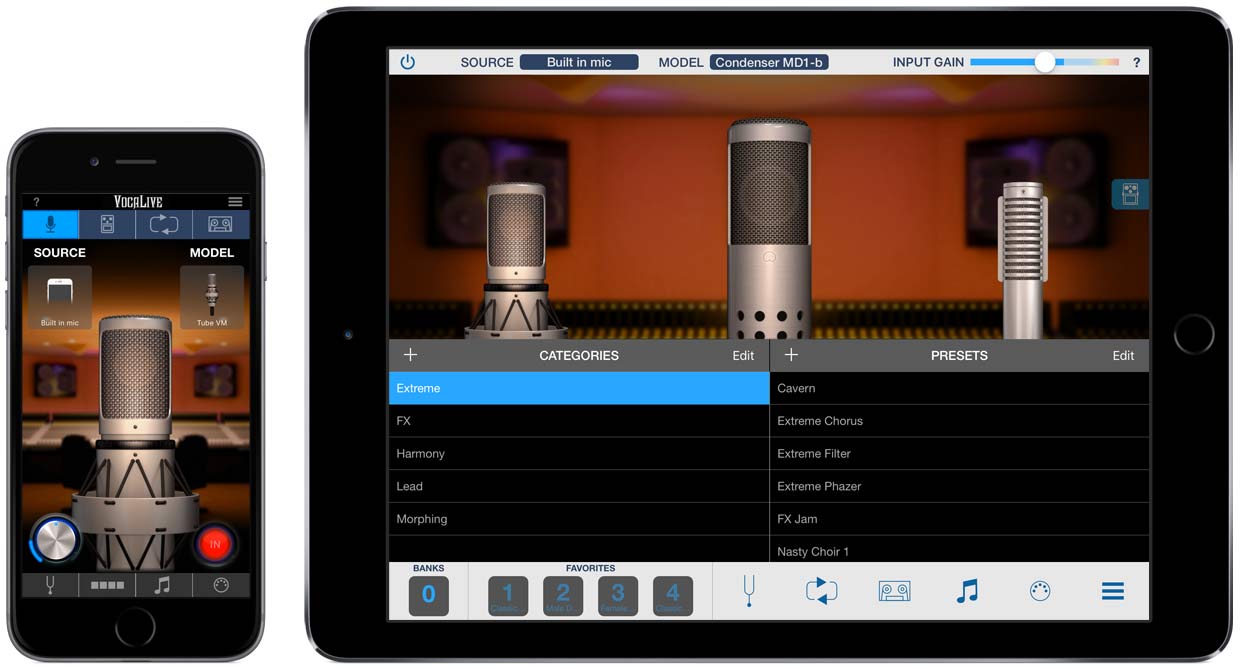
VocaLiveの新たなライブ・モードでは、ステージ上で必要な全ての情報が一目でわかるようレイアウトされています。
チェーン全体をしっかりと見渡すことができ、エフェクトのON / OFFは分かりやすくインジケーターで示され、またプリセットを簡単に表示して切り替えることもできます。
ライブ・モードはタッチで簡単に有効にできますので、思う存分ステージでのパフォーマンスに集中できます。
あなたはIKならではのフレキシビリティとサウンド・クオリティを得ながらにして、ボーカル専用マルチ・エフェクターを使用するのと同じ感覚でライブを行うことができるのです。

思いのままにコントロール
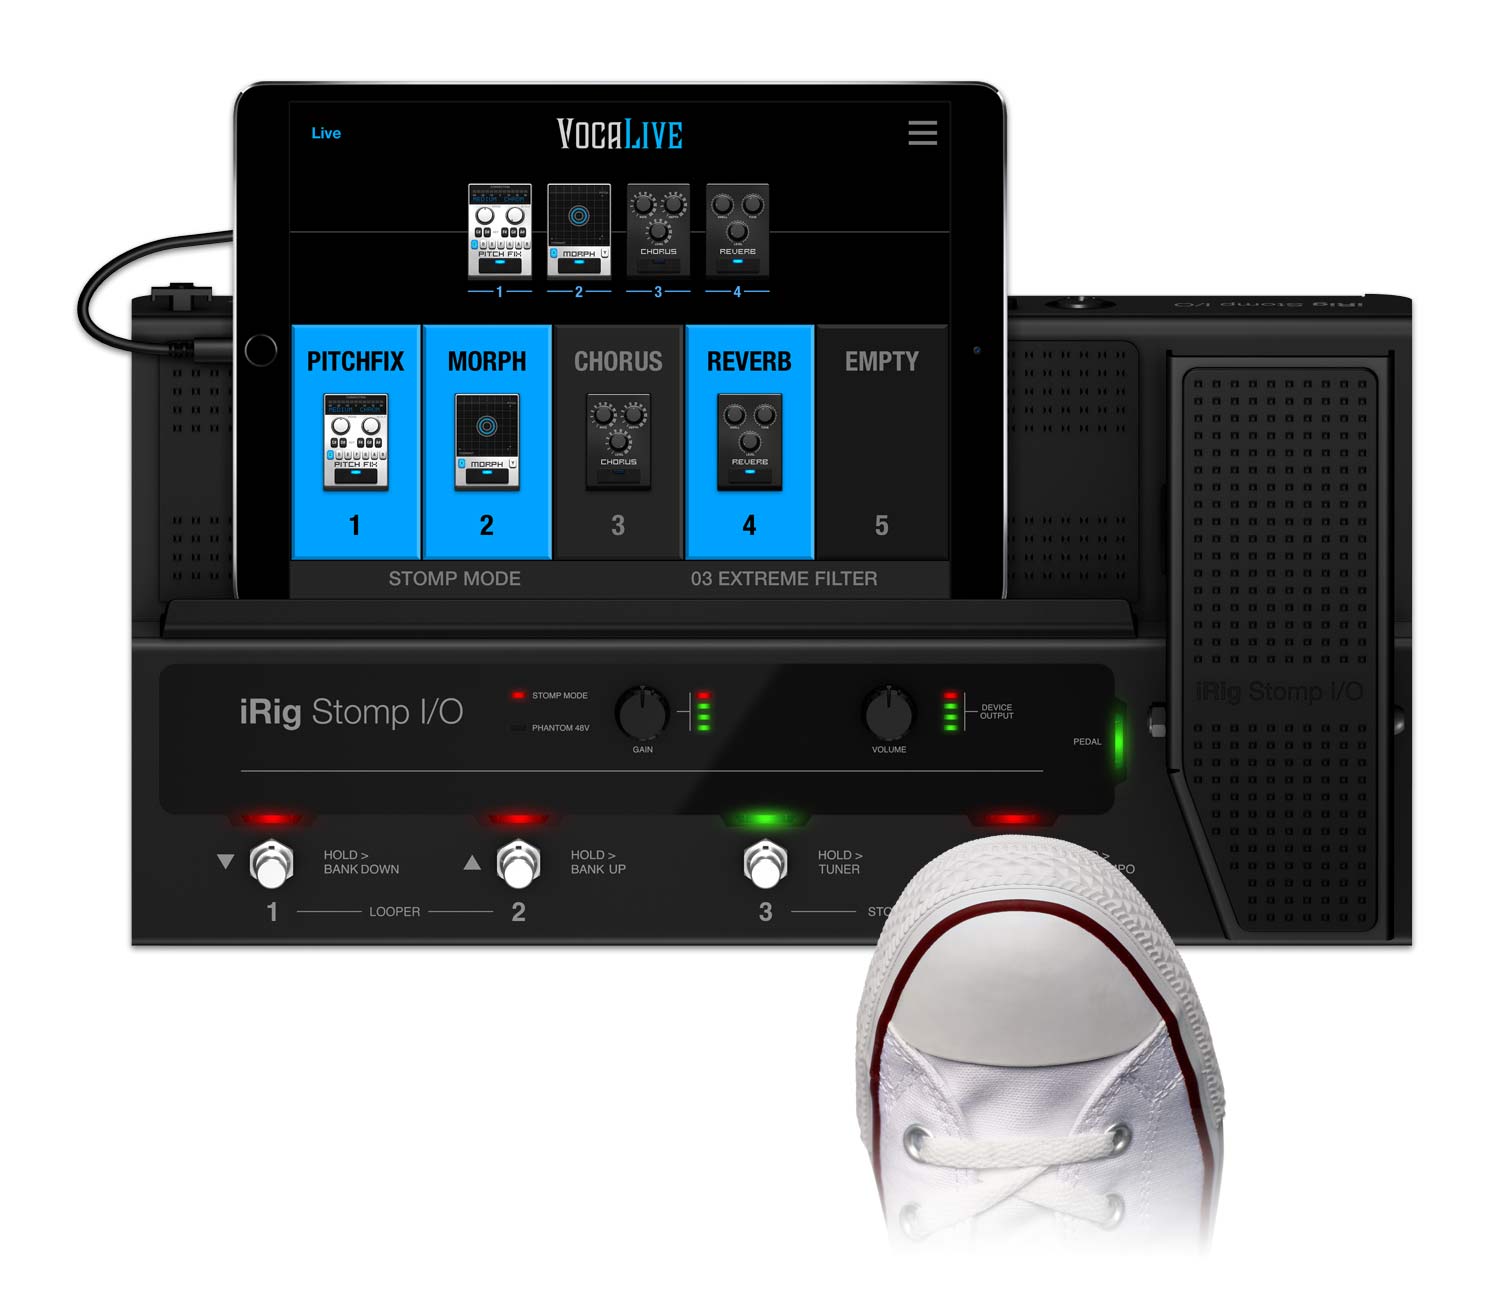
VocaLiveは様々なコントローラーとの連帯も簡単に行うことができます。例えばIKの革命的USBペダルボード・コントローラー & オーディオ・インターフェースのiRig Stomp I/Oなら、エフェクトのON / OFF、プリセット切り替えやセッティングの調整を従来のハードウェア・マルチ・エフェクターと同じフィーリングで行うことができます。iRig BlueBoardなら、同様にエフェクトのON / OFF、プリセット切り替えをワイヤレスで行うことができます。VocaLiveはMIDIに対応していますので、iRig MIDI 2のようなIKのMIDIインターフェースを用いて外部コントローラーを接続し、わずか数回のタップで簡単にパッチやパラメーターにアサインすることもできます。
ビンテージ・マイクをモデリング
IKのマイクロフォンをお使いですか?VocaLiveのマイク・モデリング機能、Mic Roomを使えば、お使いのマイクのサウンドを、ビンテージなスタジオ・マイクで収録したかのようなサウンドに変えてしまうこともできるのです。
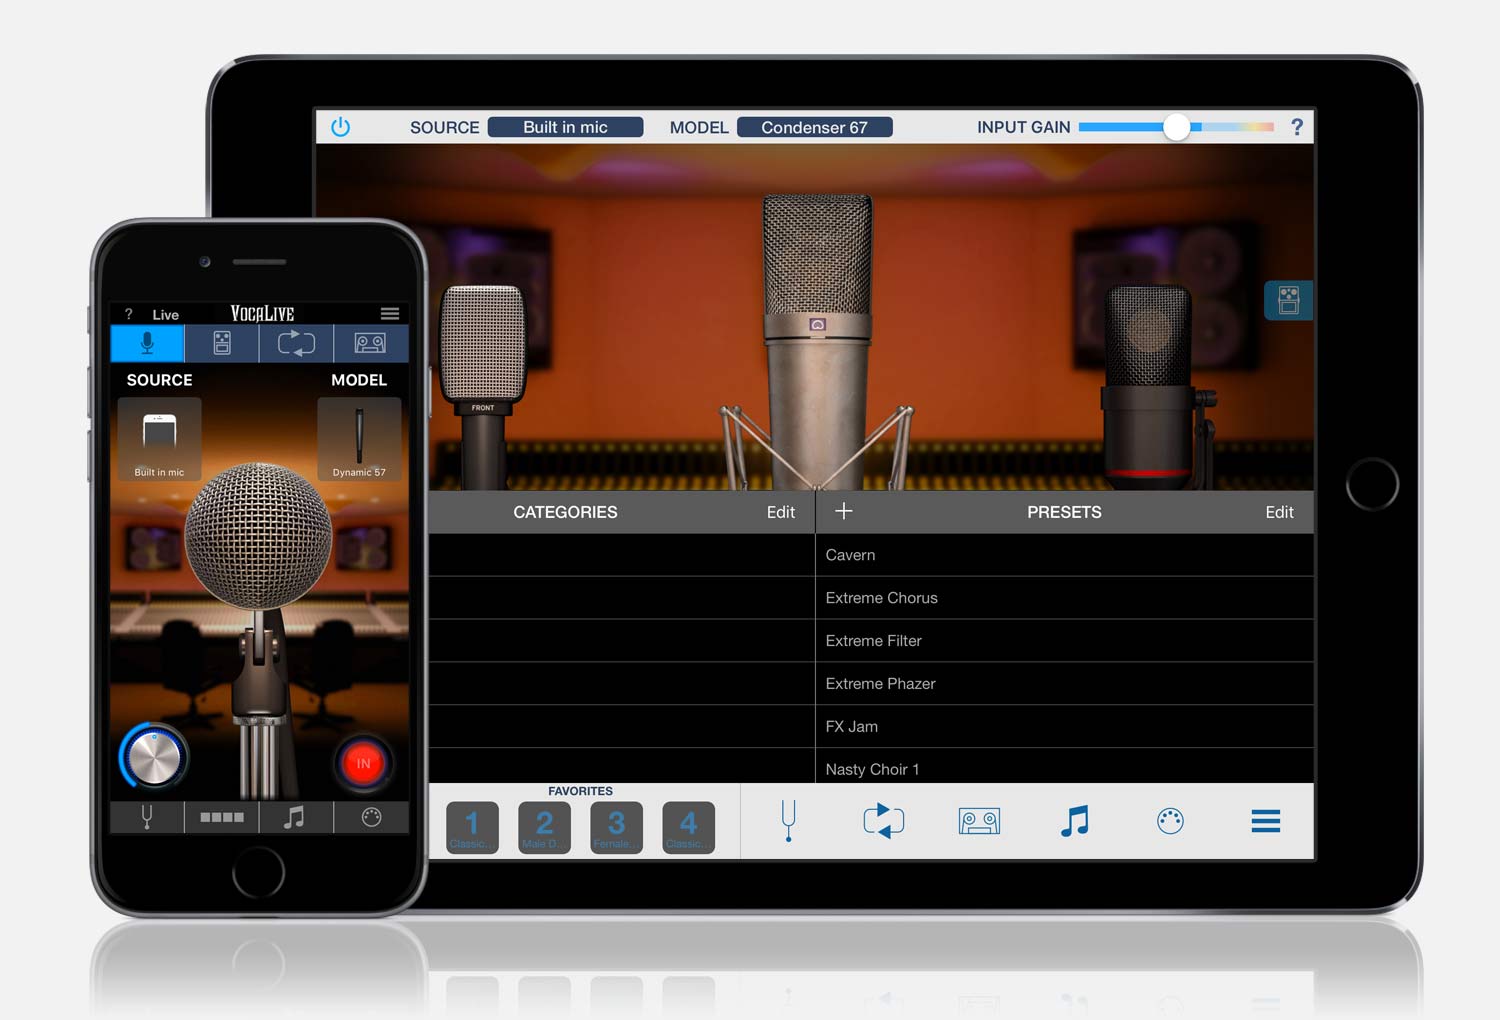
古今東西20機種のマイク名機のモデリングをアプリ内課金で追加することができます。ダイナミックから、コンデンサー、リボンなどさまざまなタイプのマイクが用意されています。
ポータブルなレコーディング・スタジオ
VocaLiveには、標準で1トラックのレコーダー機能が装備されており、アプリ内課金により、8トラックに拡張可能です。レコーディング・ミキサーの各チャンネルには、ミュート、ソロ、パン、レベル、3バンドのEQ、チャンネルごとのエフェクト・センド2系統などが装備されています。マルチチャンネルのオーディオ・インターフェースを使用すれば、最大8トラックのマルチトラック同時録音も可能です。

さらに、同じくアプリ内課金により、DAWスタイルの波形表示をベースにした編集機能も追加することができます。タッチ&ドラッグで、録音データをループさせたり、移動したり、直観的に編集作業とミックスダウンを行うことができます。完成したミックスは、WAV形式や.m4a形式のファイルとして書き出したり、共有したりすることが可能です。すなわち、VocaLiveだけで、アイディアのスケッチから、作曲、アレンジ、録音、ミックス、そしてステージでのパフォーマンスに至るまで、1つの作品を完成させることさえ可能なのです。

クリエイティブなルーパー機能
VocaLiveでは、アプリ内課金により4トラックのオーディオ・ルーパー機能を追加可能です。アイディアのスケッチから、よりクリエイティブなパフォーマンスまで、幅広い用途にお使いいただけます。
各トラックのボリュームを個別に調節できるだけでなく、iRig BlueBoardのようなMIDIコントローラーからループの再生をコントロールすることもできます。
録音したオーディオ・データは、ファイル共有機能やAudio Copy機能で書き出しが可能ですから、VocaLiveのDAW / レコーダー機能や他の音楽アプリで活用することもできます。
あなた専用のリハーサル室
ボーカル・キャンセル機能も備えたVocaLiveのSONGセクションでは、お使いのiOSデバイスのミュージック・ライブラリーからインポートした音楽ファイルを、伴奏トラックとして使用することができます。
また、ステージやスタジオでの本番前に便利な、ボーカルのウォーミングアップ用のスケールを再生してくれる機能も装備しています。

充実のプリセット機能
VocaLiveのエフェクト設定は、55種類のファクトリー・プリセットが用意されています。オリジナルの設定は、ユーザー・プリセットとして保存しておくこともできます。作成 / 保存できるユーザー・プリセットの数には制限はありません。ただ、お使いのデバイスのメモリにのみ依存します。お気に入りのプリセットを登録可能なFAVOURIT機能や、MIDIコントローラーによる呼び出しにも対応していますから、ステージやスタジオで瞬時に呼び出すことができるのです。

Inter-App AudioやAudiobusにも対応
他のアプリとの連携にも抜け目はありません。VocaLiveは、iOSのアプリ間の連携機能も充実しています。AppleのInter-App Audioに対応していますから、 Apple GarageBandのようなお気に入りのアプリで、VocaLiveのアンプやストンプボックスを活用することができるのです。
VocaLiveは、別売のサード・パーティのアプリ、 Audiobusにも対応しています。最大3つのアプリの間でオーディオのルーティングが設定できるこのアプリを使えば、他のアプリから出力される音声をVocaLiveでエフェクト処理したり、録音したりすることが可能です。
主な機能
- ボーカル・サウンドに特化したリアルタイム・エフェクト&デコーダー・アプリ。
- iPhone/iPod touch版とiPad版をご用意。
- 最大4種類のエフェクトを同時使用可。
- 5種類のボーカル・エフェクト、7種類のスタジオ・エフェクト、計12種類のエフェクトを装備。
- 一目でチェーン全体を見渡すことができ、簡単に必要なパラメーターへアクセス可能なライブ・モード。
- 2トラックのレコーダー機能を装備(アプリ内課金により最大8トラックの同時録音が可能なレコーダー / ミキサー機能に拡張可能。)
- マイクの特性をモデリングしたMic Room機能(アプリ内課金により古今東西のビンテージ・マイク20機種のマイク・モデルを追加可能)。
- 4トラック・ルーパー(アプリ内課金)。
- AutoFreeze feature allows each track to have its own full effects chain
- VocaLiveレコーダーのトラック間、対応アプリ間でのオーディオ・データのコピー&ペーストが可能。
- 端末のミュージック・ライブラリーやコンピュータのiTunesライブラリーから既存の楽曲を伴奏トラックとして読み込み可能。
- 読み込んだ音楽ファイルをカラオケ化するボーカル・キャンセル(Voice Cancel)機能。Eメール添付やFTP、SoundCloudへのアップロード、iTunesファイル共有のために、WAV、m4Aなどのファイルに書き出しが可能。
- 55種類のファクトリー・プリセットを用意。Favorites機能により、お気に入りの設定を瞬時に呼び出し可能。
- オリジナルの設定は、数の制限なくプリセットとして保存可能(端末のメモリの空き容量に依存)。
- 外部MIDIコントローラーにより、エフェクト・パラメータやルーパーのリアルタイム・コントロール、プリセットの切り替えなどが可能。
- アプリ内課金のiCloud共有に対応。
- デジタル・オーディオ入力に対応。
- メトロノーム機能やウォーミング・アップ用スケール再生機能。
- レイテンシーを抑えたリアルタイム・ボーカル・エフェクト処理。
- AudiobusとInter-App Audioに対応。
- AmpliTube for iPhone / iPadのアプリ内課金により、VocaLiveのエフェクト機能をAmpliTubeアプリでも追加 / 使用可能。
- iPhone版 / iPad版で機能、操作の違いが無く、プロジェクト・ファイルをiPhone版 / iPad版間で共有可能。
- iRig Stomp I/OやiRig BlueBoardとシームレスに対応し、ステージ上で簡単にコントロール可能
- 収録エフェクトの数を絞った無償のFREE版もご用意。
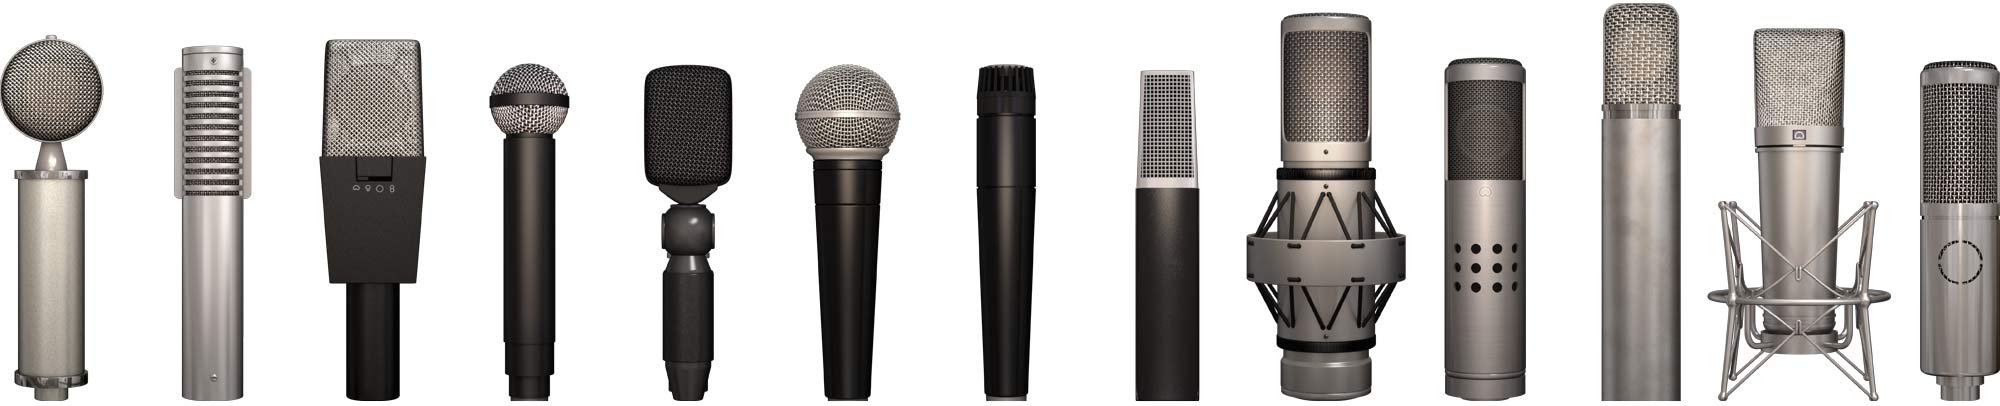
20 coveted studio microphones — all inside VocaLive
“Re-Mike” it in the Mic Room
What if you could get “that” sound — the sound of the perfect high-end recording studio microphones on your iPhone or iPad? Well, now you can. The Mic Room feature inside of VocaLive puts powerful yet easy to use microphone modeling technology inside your your iOS device.
The Mic Room lets you "re-mike" any IK microphone like iRig Mic Studio or the handheld digital iRig Mic HD to sound and perform like some of the most coveted studio microphones of all time. It lets you choose from 20 microphones that include dynamic, condenser, ribbon and some other highly creative models that are everyday tools in A-list music studios all over the world.
And it’s so easy to use
All you need to do is plug in your IK Microphone and then select a virtual microphone model that you'd like to emulate — Mic Room will automatically detect the input microphone you’re using. Mic Room lets you instantly tap into the inspiring sound of many timeless classics.
Each microphone model can be tweaked to deliver the best sound possible thanks to an intuitive graphic interface that provides an easy-to-read level meter and a touch-and-drag gain knob. You get tried and true dynamic workhorses, rich and velvety tube condensers, ultra-smooth ribbons and even more unusual creative mic types.
Microphone models available

Bottle 563
Based on
Neumann® CMV-563

Condenser 12
Based on
AKG® C12

Condenser 67
Based on
Neumann® U67

Condenser 87
Based on
Neumann® U87

Condenser 170
Based on
Neumann® TLM 170

Condenser 414
Based on
AKG® C414

MD1b-FET
Based on
Groove Tubes® MD1b-FET

Tube VM
Based on
Brauner® VM1

Dynamic 20
Based on
Electro-Voice® RE20™

Dynamic 57
Based on
Shure® SM57™

Dynamic 58
Based on
Shure® SM58™

Dynamic 421
Based on
Sennheiser® MD421

Dynamic 441
Based on
Sennheiser® MD441

Dynamic 609
Based on
Sennheiser® MD609

Vintage Dynamic 20
Based on
AKG® D20™

Ribbon 121
Based on
Royer® R121

Ribbon 160
Based on
Beyerdynamic® M160

Velo-8
Based on
Groove Tubes® VELO-8

Vintage Dynamic
Based on
Shure® Model 55™

Old Telephone Mic
Based on
Old carbon phone capsule
Your professional music production studio… always with you
You're on the go. You've got an idea. You want to get it down. But how?
The answer is in AmpliTube's built-in recording features.
AmpliTube comes with a single-track recorder that can be expanded in two big ways via in-app purchase.
The first is 8-track simultaneous audio recording with master effects.
The second is the Studio DAW-style waveform-editing suite..
In an instant, VocaLive transforms your iPad or iPhone into a fully mobile professional recording studio that has everything you need to make complete music productions while on the go.

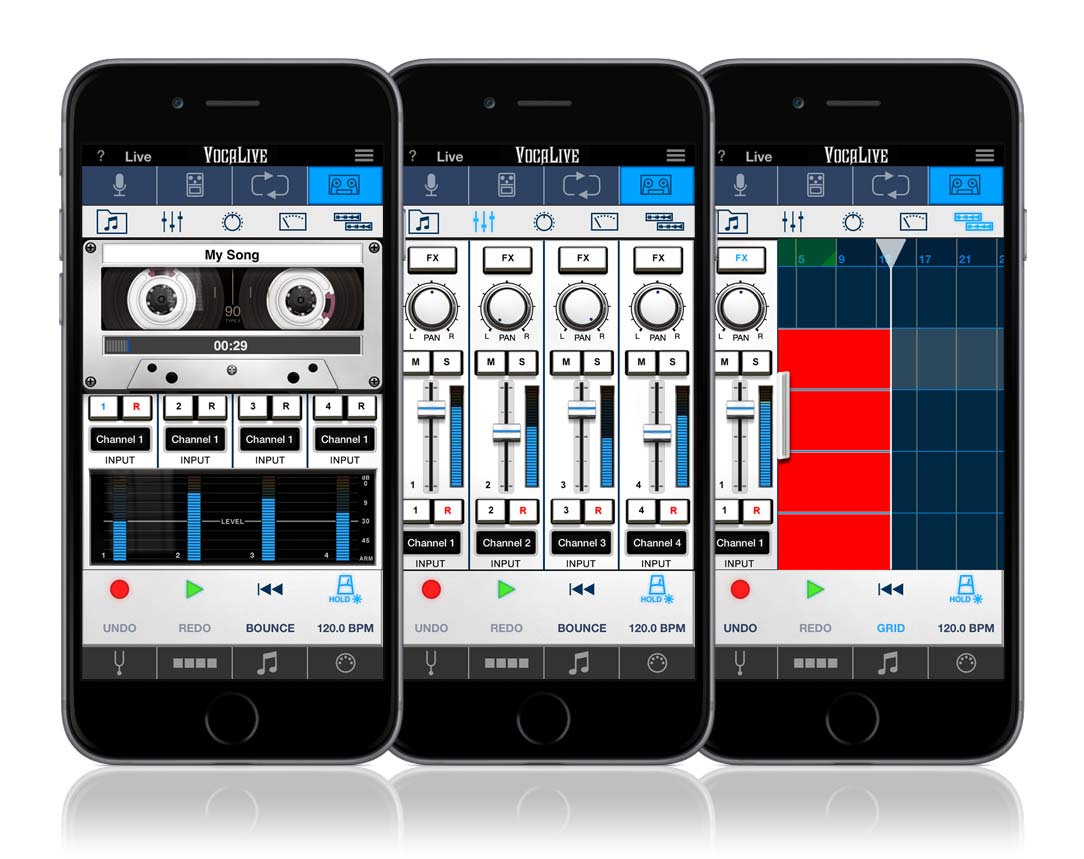
Hit record, make a record
First things first — get your idea recorded. Touching the tape recorder button in the control bar transports you to your new recording studio. This is where the magic happens. There’s a preroll feature that lets you set two measures of count-in before you start recording so you can lock onto the tempo and nail your part right from the downbeat. Hit the red “record” button and start your masterpiece. The recorder offers 8 available tracks for simultaneous multi-track recording and a bounce feature for freeing up tracks as you need them. Grab your mic and go!
Freeze
VocaLive also has an AutoFreeze feature allows you to “freeze” or save the effects chain assigned to a track (in other words, write them to the track), freeing up VocaLive’s effects for use on another track, which can then be frozen as well. This feature lets you go back and reapply or reconfigure effects based on how your individual audio tracks “sit” in the mix. So if you want to go back and tweak an effect's settings, no problem, you can “un-freeze” the effects on a track to make your adjustments.
Track control
The recorder section gives you everything you need for professional audio production.
Each track has:
- A level meter with a clipping light that monitors the input signal of the track
- An “R” button for selecting the track to record (arm/select on iPhone)
- Mute and Solo buttons
- An FX button that enables the AmpliTube signal chain on that track
- Volume and Pan controls
- Send 1 and Send 2 controls for sending the track signal to the master effects section
- 3 bands of EQ per channel
Master of effects
Want to add some polish and sparkle to your mix? The Master Effects section has been designed to give you everything you need to add that extra punch to your finished works. This section is accessed by touching the "Mast FX" button, or swiping the Track controls to the left. There you'll find the Send 1 and Send 2 effects processors.
Each of these allows you to choose from 3 levels of Reverb, 2 levels of Chorus and 3 levels of Delay. Use the “Adjust” button to fine tune the time and depth of the chosen effect’s main parameter. You can also control just how much of the effect shows up in the mix by using the Input, Mix and Output knobs.

Finally, what would a master effects section be without an equalizer? VocaLive gives you a 3-band parametric EQ that's been specially made to help you bring out the sweetness of your overall mix. Take that, run it through the included compressor for tightness and gain control, and you'll have a finished product that's ready to be shared and sold to your fans.


Edit like a Pro in the Studio
VocaLive also has a powerful and intuitive editing tool, the Studio. The Studio brings precise waveform editing and audio region manipulation to the mobile world. It's an easy, visual way of arranging while on the go that's remeniscent of some of the most powerful desktop music creation tools.

Touching the “STUDIO” button in the bottom control bar accesses the Studio section. It provides access to a range of features that have been designed to help you achieve sonic perfection. Using it is easy, it's split in two display regions on the screen: The Track Control section is on the left and the waveform timeline grid is on the right. With both in front of you, you also have access to the full signal chain plus effects, recording tools, mixing functions and more.

Tracking made simple
The Track Control section houses the controls you need to adjust and tweak the sound on individual tracks. Touch any waveform display on the right — or empty space or track number — to access the individual controls for that track on the left. Knowing where you are at any given time is simple: The number in the upper left hand corner indicates the currently selected track.
You can adjust how much of the track’s signal goes to the master effects section by using the “SEND 1” and “SEND 2” knobs. In addition, we've also included a Track EQ section below the Master button that let lets you fine-tune the EQ on each individual track, just like on a professional mixing console.
In addition to these crucial features, you also get a level meter, a peak light, a quick FX Edit button, pan control and a console-style fader for fine volume adjustment on each track.
Catch a waveform
At the core of the studio module is the waveform display section. This is where most of your audio editing will be done. From this section, you can select audio material by touching on the waveform display. This then lets you perform multiple types of edits with ease: cut, copy, copy track, paste, delete region, delete track, normalize volume or split at playhead.

Tap the waveform you want to edit to gain access to the full range of editing commands. These functions provide all the basic tools you need for working with audio regions. You can even move audio forwards and backwards in the timeline by dragging the waveform around on the screen.
Get around much?
Navigation in VocaLive’s Studio section is done with both multi-touch and simple gestures. You can zoom in and out of a region by pinching in or out with two fingers on the screen.
You can define loop start and end points by dragging a finger from left to right. You’ll notice a green area shows up when you do this. Drag the left triangle to the beginning of your desired loop and the right triangle to the end. Once defined, double tap on the green area to activate it. Then hit play on the transport to begin playback of the loop.
You can also create a “punch in” recording area. Drag your finger from right to left in the navigation bar and you'll create a red “Punch in” section. Adjust the start and end points with the triangle handles, and then activate it with a double-tap. You can de-activate loop and punch in regions by double-tapping again.
Other individual track features include the ability to solo, mute, record enable and activate the VocaLive signal chain on a track. You can record audio material directly to a track in the Studio view by using the “PLAY”, “RECORD”, “REWIND” and metronome transport controls at the bottom of the screen. There’s also a “GRID” button that turns “grid-snapping” on and off, plus “UNDO” and “REDO” commands for the human in us all.
Export Expert
VocaLive also features some handy export features once you’re done with your creations. You can export complete works of art with ease in multiple file formats and share them via email, file sharing or SoundCloud.
No matter where inspiration strikes, you’ll capture it in all its glory with the intuitive and easy to use VocaLive Recorder features. No thanks necessary… really!
Loop in your creativity
The Looper is one of the many useful tools available as an add-on for VocaLive — it gives you a quick and easy way to create up to 4 synced audio loops. Once you’ve created your looping masterpiece, you can easily export your work, and import it into the recorder or simply share your loops with the world. It's the perfect sketchpad for new ideas — it's intuitive interface is designed for easy experimentation and will inspire you to think in an entirely new (and loopy) musical way. Develop new vocal lead lines, harmonies, strange effected vocal layers, add rhythm elements with your voice, or simply record random interesting noise patterns, all at the touch of a button.
4…3…2…1…Go!
Using Looper is super easy and intuitive. Just set your preferred tempo and enable the metronome feature. Then tap the "rec" icon on the first loop button. From there it's 4, 3, 2, 1, go! Loop 1 will begin recording automatically, and it wont stop recording until you tap on the loop again.


Layer upon layer upon layer…
No matter when you tap to end your loop, your loops will always sound good because each loop is quantized to the nearest quarter note. Once closed, Loop 1 will continue to play, setting the stage for you layer more in loops 2 through 4. Just tap the "rec" icon on the second loop to start recording the next layer when the playhead comes around, and so on. The length of your first loop determines the length of all the loops the follow, and loop length is limited only by the storage available on your device. Once you've captured your audio, you can mute and un-mute individual loops by simply tapping on the loop you want to silence with your finger or stepping on a MIDI controller button. It's really that easy!

Tap dance
Want to get tricky while performing live with your loops? That's also a piece of cake!
The Looper feature integrates iRig Stomp I/O and iRig BlueBoard support and can also be controlled with any connected standard MIDI controller.
That means you can assign each of Looper's loop buttons to a corresponding physical button on a pedal board.
Now you can trigger loops from the floor, leaving your hands for more creative things, like waving at your adoring fans.


